To activate Rescue on your Hetzner Console, please open your project and do the following:
-
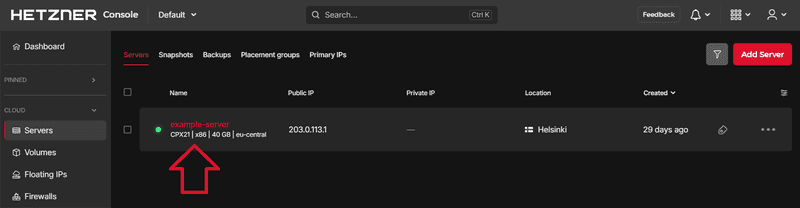
Select your server on which you would like to activate Rescue
-
Select
Rescueon the upper server menu bar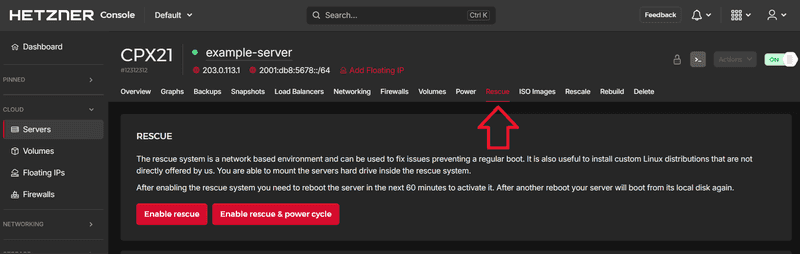
-
Select an option to activate Rescue
To activate rescue, you can choose from two options:
-
Enable rescue
Once you selectEnable rescue, rescue will be activated and after the next restart, your server will automatically boot over the network of the rescue system. The server does not automatically restart and you will have to do it manually.
Rescue remains activated for 60 minutes.
If you restart your server within those 60 minutes, the server will boot over the network of the rescue system.
If you restart your server after those 60 minutes, the server will boot from its local disk again. Rescue will automatically be deactivated again.
If you don't want to use Rescue anymore and need to restart your server within those 60 minutes, you can deactivate Rescue where you activated it. -
Enable rescue & power cycle
Once you selectEnable rescue & power cycle, your server will automatically restart and boot over the network of the rescue system.
Once the server booted over the network of the rescue system, rescue will remain active until you restart the server again.
-
-
Activate Rescue
Once you chose and selected one of the two options from step 3, a small window will pop up. You can select
linux64as your rescue OS. If you want to, you can also select an SSH key that will be used to connect to the server.
Once you select Enable rescue, you will be given a root password directly on your Hetzner Console. If you haven't selected an SSH key, you can use this password to connect to your server after the restart.
-
Connect to your server
Via SSH, connect to your server as root user.
ssh root@<203.0.113.1>Please change
<203.0.113.1>to the actual IP address of your own server.CLI warning
If you have connected to your server before, without the rescue system, there will already be a fingerprint in your local
known_hostsfile. You can think of this fingerprint as a unique identifier of the server. Usually, the fingerprint is automatically recognized when you try to connect to this IP address. With the rescue system, however, this fingerprint is not valid.Therefore, when you are connecting to your server via the rescue system, you might get a warning like this:
@@@@@@@@@@@@@@@@@@@@@@@@@@@@@@@@@@@@@@@@@@@@@@@@@@@@@@@@@@@
@    WARNING: REMOTE HOST IDENTIFICATION HAS CHANGED!     @
@@@@@@@@@@@@@@@@@@@@@@@@@@@@@@@@@@@@@@@@@@@@@@@@@@@@@@@@@@@

...
...
...

Offending ECDSA key in /home/user/.ssh/known_hosts:2
  remove with:
  ssh-keygen -f "/home/user/.ssh/known_hosts" -R "<203.0.113.1>"

...
...
If you do get a warning like this, you will have to remove the old fingerprint from the
known_hostsfile as explained in the next step.If you do not get a warning like this, you can skip to step 7.
-
Remove the existing fingerprint
The fingerprint saved in the
known_hostsfile is only not valid for the rescue system. As soon as Rescue is deactivated, the fingerprint will be valid again.Since you can use the fingerprint again, it is enough to add a hash sign for now and leave the fingerprint in the file as a comment. You can remove the hash sign after the server booted from its local disk again. Alternatively, you can also delete the fingerprint and create a new one later, if needed.
-
Add a comment
You can leave the fingerprint as a comment for the time you are using Rescue. The lineOffending ECDSA key in /home/user/.ssh/known_hosts:2from the warning tells you the line in which your fingerprint is saved in theknown_hostsfile. In this example the fingerprint is in line 2.
Edit theknown_hostsfile on your local device:nano ~/.ssh/known_hostsAdd the
#in front of your fingerprint in the line from the warning:|1|lPqnDMjklla23lPqnDMjkllPq9=|lPqnDMjklla233lPqnDMjklla... #|1|vlQvhfjekla23lPqnDMjklop5E=|343Pfd964BZxg3kfdIEYKLue4...Once you are done, you can use
CTRL+Xto save the file,Yto confirm andENTERto close the file.When you end rescue, you can remove the hash sign again. You will also have to delete the new rescue fingerprint.
-
Delete the fingerprint
Alternatively, you can also use the command from the warning to delete the fingerprint from theknown_hostsfile.ssh-keygen -f "/home/user/.ssh/known_hosts" -R "<203.0.113.1>"
Now that the fingerprint was removed, you can use
ssh root@<203.0.113.1>again to connect to your server. This time, there should only be a warning about host authenticity. You can enter yes and the new fingerprint will be saved in the localknown_hostsfileAfter you restarted your server without Rescue again, you can remove the fingerprint created for Rescue from your
known_hostsfile. The fingerprint should have been added at the end of the file. -
-
End Rescue
If you end the connection to your server with
CTRL+D, for example, Rescue will remain active. This means, when you start a new connection, you will still be on the rescue system.The only way to end Rescue is to restart the server once again. Then, the system will boot from its local disk again.