Load Balancers are used to distribute traffic across multiple target servers in order to reduce load on individual servers. See full Load Balancer overview.
To create a new Load Balancer on your Hetzner Console, please open your project and do the following:
-
Go to Load Balancers on the left menu bar

-
Select Create Load Balancer
-
Create your Load Balancer
You can customize your Load Balancer with the following features:
○ Location
This is where your Load Balancer will be located. For smaller projects you can choose any location you prefer. For bigger projects we recommend choosing the closest location.○ Type
Choose a Load Balancer plan that fits your needs the best. You will be able to change the performance at any time.○ Network
Servers use private Networks to communicate directly with each other. If you add your Load Balancer and your servers to the same Network, you will be able to use the private IPs of those servers to add them as targets. This also includes dedicated servers from your Hetzner Robot account (see Can I include my Hetzner dedicated servers in my Hetzner Cloud Networks?).○ Targets
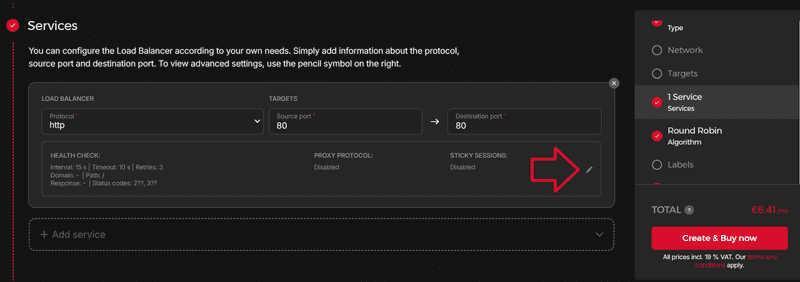
This is where you can add cloud servers and labels. It is also possible to combine this cloud feature with dedicated servers from your Hetzner Robot account. You can add the public or private IP of a cloud server and the public or private IP of a dedicated root server (Robot account) as a Load Balancer target. To use the private IP, make sure your Load Balancer and the servers are in the same Network.○ Services
This is where you can add information about the protocol, source port and destination port. You can open advanced settings via the pencil symbol on the right.
○ Algorithm
Round Robin
This algorithm distributes traffic in a specific order. Least Connections
This algorithm monitors traffic on the servers. Incoming requests are then redirected to the server with the least traffic.Example:
In this example, you can see two Load Balancers. One with the algorithm "Round Robin", and the other one with the algorithm "Least Connections".
LB 1TrafficRound RobinServer 1highServer 2highServer 3lowLB 2TrafficLeast ConnectionsServer 1highServer 2highServer 3low
With Load Balancer 1 (LB 1), a new request will go to Server 1, the next request to Server 2, then to Server 3, and the next one to Server 1 again.
With Load Balancer 2 (LB 2), new requests will all go to Server 3 until one of the other servers has less traffic than Server 3. Then, requests will be directed to the new server with the least traffic.○ Label
You can use labels to filter your Load Balancers.
Labels are key/value pairs, with "value" being optional. This means you can choose yourself if you want your Load Balancer to have a simple label that only consists of the key part, or a complete key value pair. To create pairs, enter the key part and then use theenterkey or the equals sign ("key=value") to switch to the value part. Both key and value must be 63 characters or less, beginning and ending with an alphanumeric character and alphanumerics can be used inbetween. You can copy & paste several labels at the same time by separating them by comma or with a space.
Example:
If you copy & paste this text to the label box:You will get these labels:env=production,type=round-robin,project2
env production , type round-robin , project2○ Name
This will be the name of your Load Balancer. Please note that it is not possible to use names more than once per project.
If you are happy with your settings, click on CREATE & BUY NOW to create the new Load Balancer.
Next: