To connect to a server via SSH when the server does not have a public network, you will have to connect to it via a private network. Therefore, you will first have to connect to a server that has a public IP address. As long as this server is in the same private network as the server without public IPs, you can use the private IP to connect to the second server.
| Your device | Server with public IP | Server with private IP | ||
|---|---|---|---|---|
| public network | ⇾ | public network | ||
| private network | ⇾ | private network |
Next to your server with private IP you will need a second server. The second server has to have a public IP and has to be in the same private network as the server without public IPs.
Therefore, you will need two servers as shown in this example:
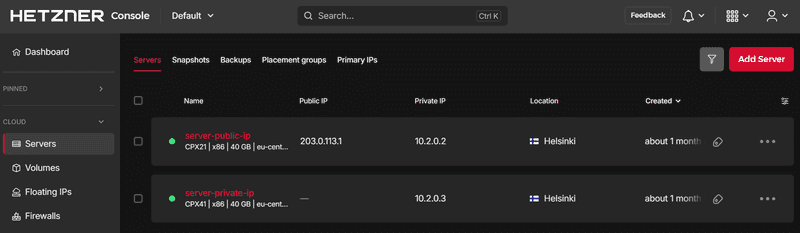
Note that both servers have to be in the same private network.
In the first steps below, it is explained how to connect to the public server and how to then connect from the public server to the private server.
In the final two steps 6 and 7 it is explained how to edit the config file so that in future you can connect directly to the server without public IPs, without having to manually connect to the server with public IP first. Instead, this connection will automatically be established in the background.
After your servers have been created, you can connect to them via SSH by using a command-line interface (CLI).
-
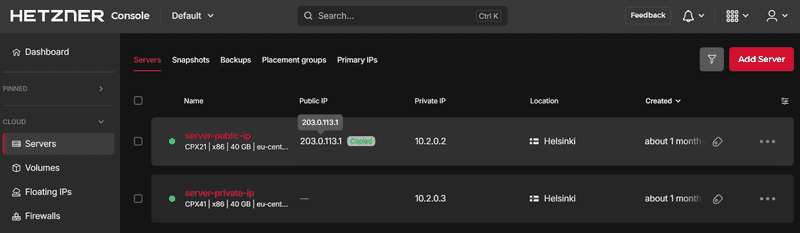
Enter the following command to connect to your server with public IP
Via IPv4 or IPv6:
-
IPv4
$ ssh root@<203.0.113.1>Change
<203.0.113.1>to the actual IPv4 address of your own server. -
IPv6
The cloud servers are always assigned a /64 network for their IPv6. By default, we assign the first address from this network to the server. To connect to your server, do not specify the network/64in the end, but instead use the first address1.$ ssh root@<2001:db8:1234::1>Change
<2001:db8:1234::1>to the actual IPv6 address of your own server.
You can copy your IP address from the Hetzner Console by clicking directly on the address.
CLI warning
If there is a warning about host authenticity, you can enter yes.
The authenticity of host '<203.0.113.1> (<203.0.113.1>)' can't be established.
ECDSA key fingerprint is SHA256:Jw/3FIJwpp3FIJw/3FIJw/3FppLVppmjWs.
Are you sure you want to continue connecting (yes/no/[fingerprint])?
The fingerprint shown in the warning will be saved locally and automatically be recognized in the future. You can access this fingerprint in the following file:
~/.ssh/known_hostsIf you delete your server, the fingerprint will no longer be valid.
-
-
The next step will depend on whether you have added an SSH key when you created your server
-
SSH key
If you have not set a password, you will automatically be connected. If you have set a password, please enter it now. -
No SSH key
Your root password will have been mailed to you if you created a server without selecting an SSH key. Please enter it now.
Please note that your password will not be visible in the CLI.
-
-
Change your password
The first time you login into your server via root password you will be asked to change your password.
Please enter your current password and set your new password.
-
Create an SSH key
Before you connect to the second server via its private IP, you can add an SSH key.
This step can optionally be skipped. In this case, you would always have to enter your password.
-
Create the key
Execute the following command on your server with public IP to create a new SSH key of the typeed25519:ssh-keygen -t ed25519
Now, execute the following command to save the public key on the server without public IPs:ssh-copy-id -i ~/.ssh/id_ed25519.pub root@<10.2.0.3>Change
<10.2.0.3>to the actual private IP address of your server without public IPs.You will be asked to enter the password of root. Your root password should have been mailed to you after you created the server.
Now that the SSH key has been saved, you can connect to your server without public IPs, without having to enter a password again.
More information about SSH keys: Tutorial "Setting up an SSH key"
-
-
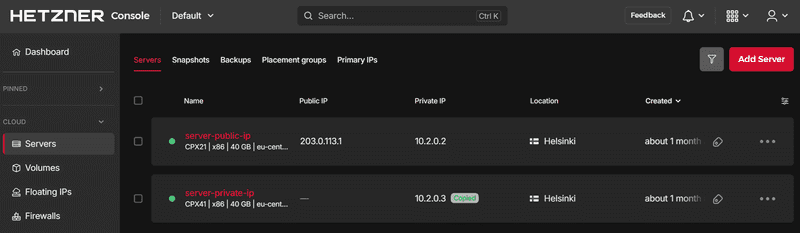
Enter the following command to connect to your server without public IPs
$ ssh root@<10.2.0.3>Change
<10.2.0.3>to the actual private IP address of your server without public IPs.You can copy your IP address from the Hetzner Console by clicking directly on the address.
If there is a warning about host authenticity, you can enter yes again.
If you added an SSH key, as explained in step 4, you will be directly connected to your server.
If you haven't added an SSH key, you will be asked to enter your password. Your root password should have been mailed to you after you created the server. -
Edit the
configfile on your local deviceNow that you have seen how to connect to both servers manually, you can edit the
configfile so that in the future the connection to the server with public IP is build automatically. This way, you will be able to directly access the server without public IPs without having to connect to a second server manually.First, use
CTRL+Dto end the connection to your server without public IPs. You should now be back on your server with public IP.
UseCTRL+Done more time. This should end the connection to the server with public IP and you should now be back on your local device.You can add new entries to the
configfile in the following format:Host <unique-name> HostName <IP-address> User <username> PreferredAuthentications <publickey/password>With an entry like this, you can simply use
ssh <unique-name>instead ofssh <username>@<IP-address>to connect to the server.It is possible to add the option "ProxyJump" to an entry. This option is used to specify from where the connection should be built if not from the local device. If this option is not added, the local device will simply connect to the given IP directly. If you do add this option, you will have to specify the
<unique-name>of another entry. The device will then first connect to the IP of the<unique-name>specified for ProxyJump. From there, the connection will then be built to the IP of the entry the ProxyJump was added for.local device unique-name-1 unique-name-2 HostName 203.0.113.1 10.2.0.3 ProxyJump N/A unique-name-1 If you enter
ssh unique-name-1, your local device will directly connect to203.0.113.1.
If you enterssh unique-name-2, your local device will first connect to203.0.113.1and then from there to10.2.0.3.Edit the
configfile on your local device:nano ~/.ssh/configAdd the following text at the end of the file:
Host server-public-ip
        HostName 203.0.113.1
        User root
        PreferredAuthentications publickey

Host server-private-ip
        HostName 10.2.0.3
        User root
        PreferredAuthentications publickey
        ProxyJump server-public-ip
Change
203.0.113.1and10.2.0.3to the actual IP addresses of your servers. If you haven't added SSH keys to your servers, change your "PreferredAuthentications" from "publickey" to "password".Once you are done, you can use
CTRL+Xto save the file,Yto confirm andENTERto close the file.With the first entry, you can now use
ssh server-public-ipinstead ofssh root@203.0.113.1to connect to your server with public IP.With the second entry, you can now use
ssh server-private-ipto directly connect to your server without public IPs. Your local device will automatically first connect to the server with public IP - as it is specified as "ProxyJump" - and then from there to the second server. -
Use a single command to connect to your server without public IPs
ssh server-private-ipYou should now be directly connected to your server without public IPs, without having to manually connect to the server with public IP. To end the connection, use
CTRL+D.
Next: