This tutorial explains how to install the open-source content management system (CMS) Contao. You can use Contao to create your own website.
This is a 3rd party application. We do not provide Contao technical support, and we cannot guarantee that it will work properly. For Contao support, please see https://contao.org/support
Example terminology
- Username:
contaoy - Hostname:
<wwwXXX> - Domain:
<example.com> - Subdomain:
<contao.example.com>
Install Contao
Step 1 - Download Contao Manager
There are two ways to download Contao. Choose one of those two options:
-
Option 1 - Via an SSH connection
For this option, you need Web Hosting Level 9 or higher.- Download the file
After you have established an SSH connection to your server, you can download the file directly into thepublic_htmldirectory.contaoy@<wwwXXX>:~$ cd public_html contaoy@<wwwXXX>:~/public_html$ wget https://download.contao.org/contao-manager/stable/contao-manager.phar - Rename the file
Once thecontao-manager.pharfile is downloaded, you can rename it.contaoy@<wwwXXX>:~/public_html$ mv contao-manager.phar public_html/contao-manager.phar.php
- Download the file
-
Option 2 - Via WebFTP
- Download Contao on your local device
Go to https://contao.org/download and click on theDownloadbutton under "Contao Manager". The filecontao-manager.pharshould now be in your "Downloads" directory, and you can upload it to WebFTP. - Open konsoleH and go to
Extras→WebFTP ».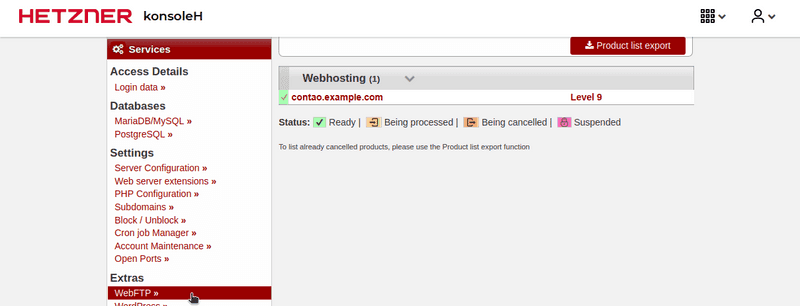
- When you open the WebFTP, select
Add filesunderpublic_html.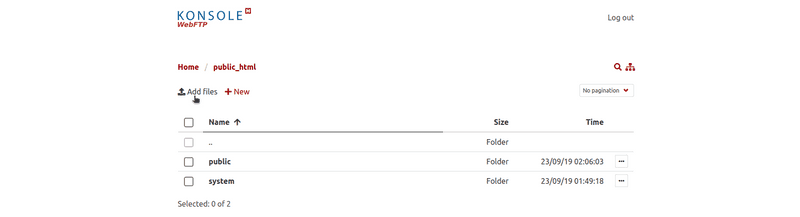
- The
contao-manager.pharfile should be in the "Downloads" directory. When you find the file, select it.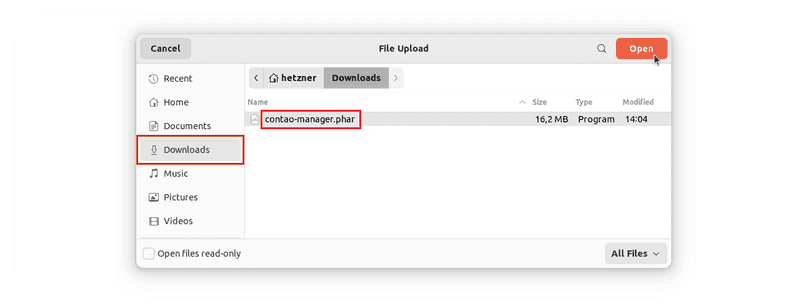
- Open the drop-down menu by clicking on the three dots next to
contao-manager.pharand selectRename.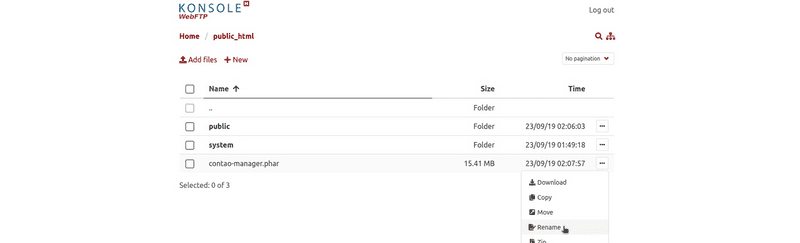
- In the text field, enter
contao-manager.phar.phpand clickRename.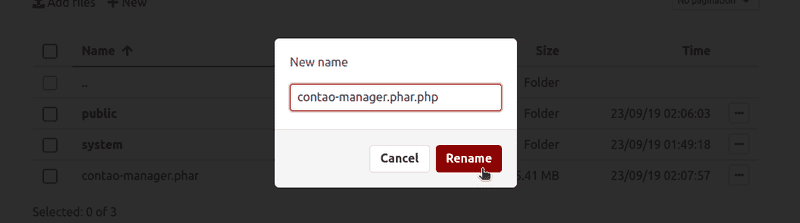
- Download Contao on your local device
Step 2 - Access your domain and create a user
Enter your domain name and add the file name at the end of the domain. For the example used in this tutorial, it would be contao.example.com/contao-manager.phar.php.
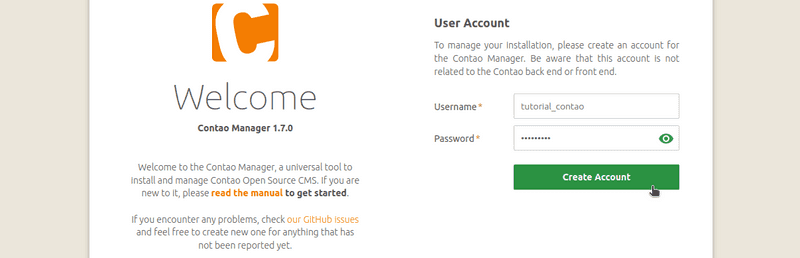
You should now see a welcome page and the option to create a user account for the Contao Manager. Enter a username and a secure password and click on Create Account.
Step 2.1 - Fix PHP Web Process error
During the system checks, you might get an error like Installation Issues Detected with the following information:
PHP Web Process
The PHP setting "allow_url_fopen" is not enabled on the server.
You can enable allow_url_fopen on konsoleH.
- Open konsoleH in a second window.
- Go to
Settings→PHP Configuration ». - Scroll down to "PHP settings" and set the value of
allow_url_fopento "On".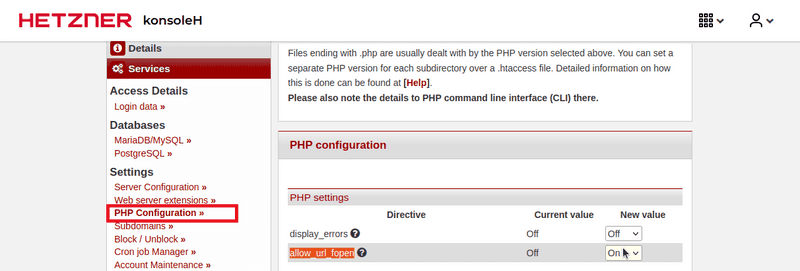
Step 3 - Set up Contao
- Go back to your domain (for example
contao.example.com/contao-manager.phar.php). - When it comes to the final check, you might get a warning like this:
Click on
Contao Installation No Contao installation has been found.Setupon the right.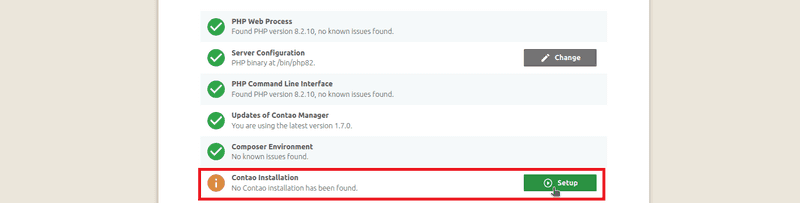
- You should now see the Contao Open Source CMS installation wizard. Click on
Get started.
Step 3.1 - Set up the path
- In the Contao installation wizard, it sould say "Webserver Setup" on the left. Click on
Setup Directorieson the bottom right. - Open konsoleH in a second window.
Go to
Settings→Server Configuration ». In "Server configuration (.htaccess)", selectpublicand click onDocument root.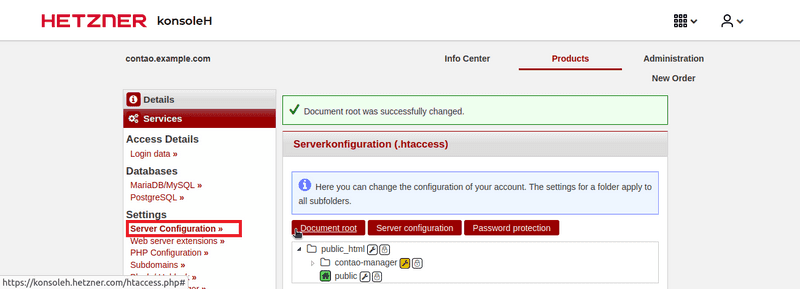
- Go back to the Contao installation wizard. It should now say something like this:
Click on
The directory structure on your web server is set up correctly!Continue.
Step 3.2 - Start the installation
Select the latest Contao version and an initial setup option, such as "Full installation", and click on Install.
Step 3.3 - Add a database
- Add information about your database. Example:
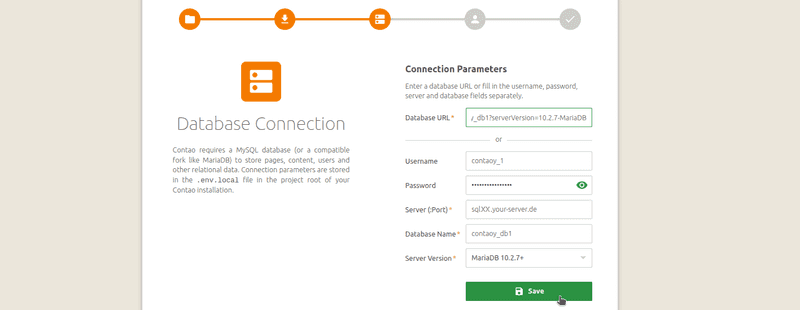 Once you are done, select
 Save. - Click on
Check database.
You might get a warning like this:If you get this warning, click onYour database is not up to date. Please review the console output below and execute the changes.Executeright below "Database Updates". Once it is done, click onConfirm & Close. - When it successfully connects to your database, click on
Continue.
Step 3.4 - Create a backend account
On the left, you should now see "Backend Account". On the right, enter a username, name, email address and password and select Add account.
You can now login to Contao.

Further steps
If everything works as expected, you can now create your own website! You can set up your website at https://contao.example.com/contao and create your first index page as it is explained in the official Contao documentation. You can access your website at https://contao.example.com.