This tutorial explains how to install the free online store management system OpenCart. You can use OpenCart to create a website for your own store.
This is a 3rd party application. We do not provide OpenCart technical support, and we cannot guarantee that it will work properly. For OpenCart support, please see https://forum.opencart.com
Example terminology
- Username:
opencap - Hostname:
<wwwXXX> - Domain:
<example.com> - Subdomain:
<opencart.example.com>
Install OpenCart
Step 1 - Download OpenCart
You can download OpenCart via an SSH connection or via an FTP connection. You can find your access details on konsoleH when you go to Access Details→Login data ».

-
Option 1 - Via SSH connection
For this option, you need Web Hosting Level 9 or higher.-
Download the ZIP file
After you establish an SSH connection to your server, you can download the ZIP file directly into thepublic_htmldirectory.opencap@<wwwXXX>:~$ cd public_html opencap@<wwwXXX>:~/public_html$ wget https://github.com/opencart/opencart/releases/download/4.0.2.3/opencart-4.0.2.3.zip -
Unzip the ZIP file
Once theopencart-<version>.zipfile is downloaded, you can unzip it.opencap@<wwwXXX>:~/public_html$ unzip opencart-4.0.2.3.zipYou should now see the
opencart-4.0.2.3directory within thepublic_htmldirectory. -
Move the files
Within theopencart-4.0.2.3directory, there is a directory calledupload. You can now move all the iles within theuploaddirectory to thepublic_htmldirectory.opencap@<wwwXXX>:~/public_html$ cd opencart-4.0.2.3/upload opencap@<wwwXXX>:~/public_html/opencart-4.0.2.3/upload$ mv * ../..The
uploaddirectory should now be empty. All the files should now be in thepublic_htmldirectory instead. -
Rename files
Within thepublic_htmldirectory, you now need to rename theconfig-dist.phpfile toconfig.php. You need to do the same with theconfig-dist.phpfile within theadminsubdirectory.opencap@<wwwXXX>:~/public_html$ mv config-dist.php config.php opencap@<wwwXXX>:~/public_html$ mv admin/config-dist.php admin/config.php
-
-
Option 2 - Via FTP connection
-
Download the ZIP file on your local device
Go to https://www.opencart.com/index.php?route=cms/download and click onDownload nowfor the option "Download & host your own". -
Unzip the ZIP file
- On your local device, open the "Downloads" directory. There, you should see the OpenCart ZIP file.
- Right-click on the OpenCart file.
- In the menu that opens, select "Extract Here" (Linux) or "Extract All..." (Windows).
-
Upload the unzipped files via FTP
You now need to copy the files on the server via FTP. Theopencart-4.0.2.3directory should be in the "Downloads" directory.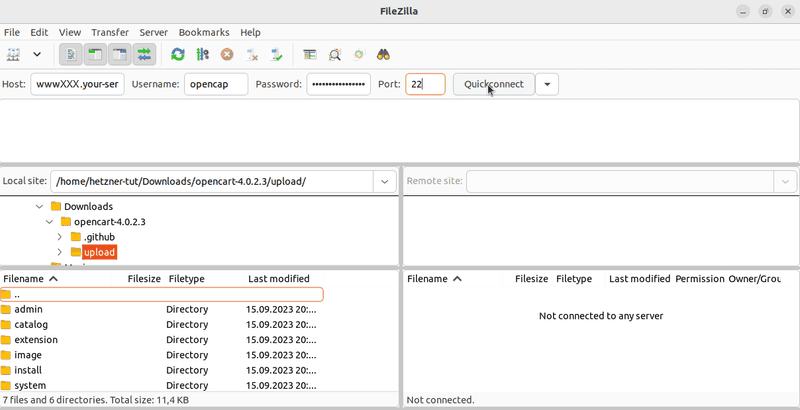 Within the
 opencart-4.0.2.3directory, there is a subdirectory calledupload. Select all the files within theuploaddirectory on your local device and copy them to thepublic_htmldirectory on the server. If you don't want to use the main page for your shop, you can save the files in a subdirectory calledopencartwithin yourpublic_htmldirectory, for example.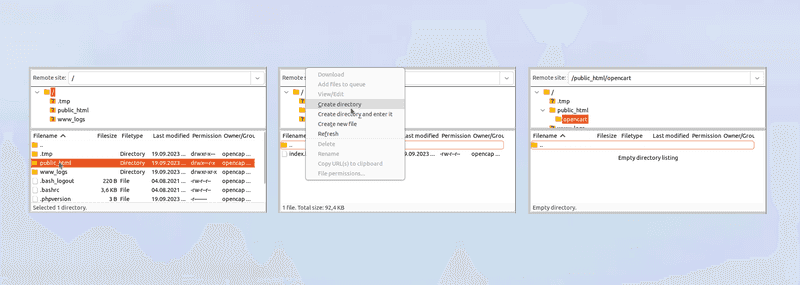
-
Rename files
You need to rename theconfig-dist.phpfile toconfig.phpin two directories:public_html/config-dist.phpphblic_html/admin/config-dist.php
Right-click on the two files and click on "Rename". Rename the files to
config.phpand save your changes.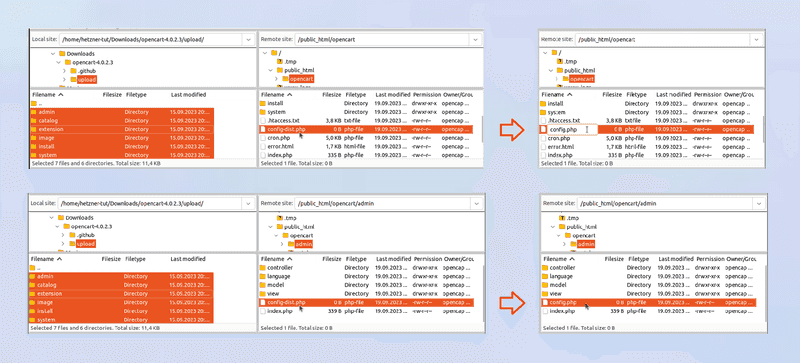
-
Step 2 - Install OpenCart
Enter your domain name in a web browser (e.g. opencart.example.com). If you saved your files in a subdirectory, you need to add the directory name at the end of the domain (for example opencart.example.com/opencart). You should now be on the OpenCart installation page.
-
Accept the license agreement
Read the license agreement and selectContinue.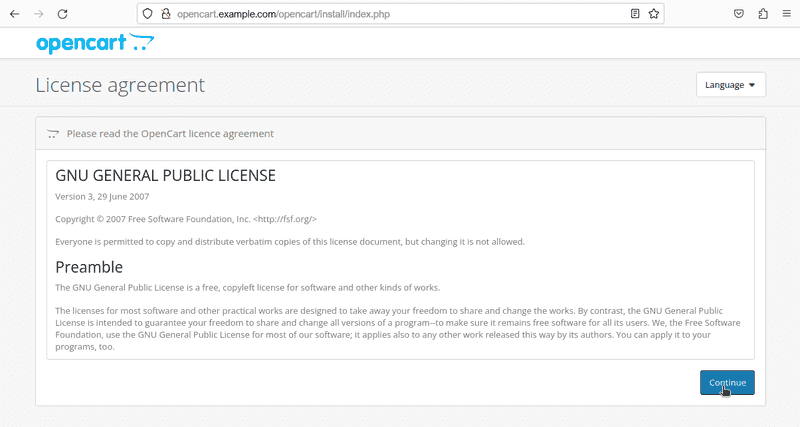
-
Automatic check
The next step checks the configuration. The checkmarks should all be green and the files should be "Writable".If there are any issues with the files at the bottom, you can change the permissions of those files to 777 until the installation is complete.

-
Set up the database and a user
Add the database and create a new user with administrative permissions to manage the shop. Next, click on Continue.
To view the information about your database, go to konsoleH and then
Datenbanken→MariaDB/MySQL ». If you don't have a database yet, you can add one now.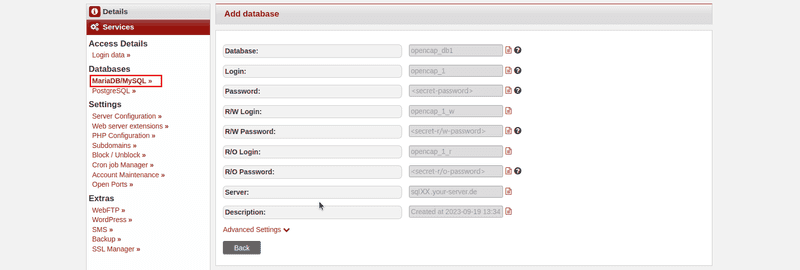
The installation should now be complete.
Step 3 - Delete the installation directory
For security reasons, you should now delete the install directory on the server. Just as before, you have two options:
-
Option 1 - Via SSH an connection
For this option, you need Web Hosting Level 9 or higher.After you establish an SSH connection to your server, you can delete the directory from the
public_htmldirectory.opencap@<wwwXXX>:~$ cd public_html opencap@<wwwXXX>:~/public_html$ rm -rf install
-
Option 2 - Via an FTP connection
After you establish an FTP connection to your server, you can delete the directory from the
public_htmldirectory. If you saved the files within a subdirectory, you need to open thepublic_html/opencartdirectory.
Right-click on theinstalldirectory and click on "Delete".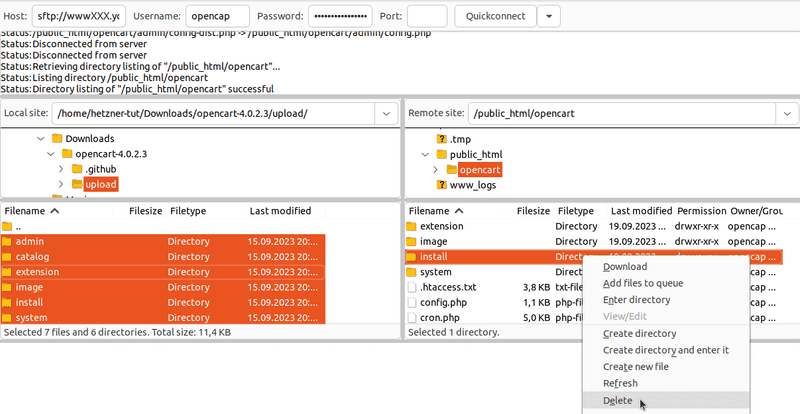
Further steps
If everything works as expected, you can now create your own website! You can set up your website at https://opencart.example.com/admin, and you can access your website at https://opencart.example.com.