The Hetzner Server Monitoring (System Monitor/SysMon)
Hetzner clients can use the Server Monitoring System to monitor their servers and have an email sent to them when the status of one of the monitored services changes.
You can set this system up on Robot and going to the server's Monitoring tab.
Conditions
Important note: You need to activate both Cookies and JavaScript in your browser for both robot.hetzner.com and sysmon.your-server.de for the Server Monitoring system to work.
In addition, the server that you want to monitor needs to allow all access from our Monitoring Systems.
To do this, you can query the IP addresses of our systems via DNS (pool.sysmon.hetzner.com):
$ dig pool.sysmon.hetzner.com

;; ANSWER SECTION:
pool.sysmon.hetzner.com. 6768	IN	A	213.133.113.82
pool.sysmon.hetzner.com. 6768	IN	A	188.40.24.211
pool.sysmon.hetzner.com. 6768	IN	A	213.133.113.86
pool.sysmon.hetzner.com. 6768	IN	A	213.133.113.84
pool.sysmon.hetzner.com. 6768	IN	A	213.133.113.83
...
$ dig pool.sysmon.hetzner.com AAAA
;; ANSWER SECTION:
pool.sysmon.hetzner.com. 6744 IN AAAA 2a01:4f8:0:a101::6:1
pool.sysmon.hetzner.com. 6744 IN AAAA 2a01:4f8:0:a101::5:1
pool.sysmon.hetzner.com. 6744 IN AAAA 2a01:4f8:0:a112::c:1
pool.sysmon.hetzner.com. 6744 IN AAAA 2a01:4f8:0:a101::6:3
pool.sysmon.hetzner.com. 6744 IN AAAA 2a01:4f8:0:a101::6:2
...In scripts on Linux, it's beneficial to use getent(1) instead. Its output is easier to parse. Instead of ahostsv4, use ahostsv6 for IPv6 addresses.
$ getent ahostsv4 pool.sysmon.hetzner.com|awk '{print $1}'|sort -u
188.40.24.211
213.133.113.82
213.133.113.83
213.133.113.84
213.133.113.86
If necessary, we may add more in the future.
Make sure that your firewall allows access to our Monitoring Systems' IP addresses so the Monitoring System can monitor your server.
Overview
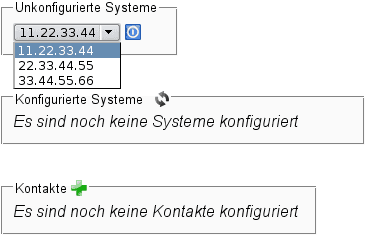
If you are using the Server Monitoring System for the first time, you should see the following:

(Note: You will see your own IP addresses here instead.)
At this point, you have not yet configured systems or contacts. You will simply see a list of the available systems and their IP addresses.
Contacts
You can add multiple contacts and assign different systems to them.
To add a contact, you can click on the green plus sign
 next to the Contacts label. An input form will appear at the bottom of the contacts list, where you can enter a description and address. By clicking on the save button
 , you will save the contact, and it will be available for the different systems.

Important note: You need to add the contact needs to a system before you use it. (See the description lower down).
Systems/Server
If you are using the System Monitor for the first time and have not yet configured any systems, at the top of the page, you will see a menu with the IP addresses of systems that are available. (See illustration above).
Select the system you want, and click on the button right next to it. It then appears in the list called Configured Systems.

The new system is initially disabled and has no contacts or checks. You should first add checks and contacts before you activate the system.
Right next to the IP address, there is a small text field. You can click on it and use it to enter a short description for the system; this description will also appear in the email notifications.
Adding checks to a system
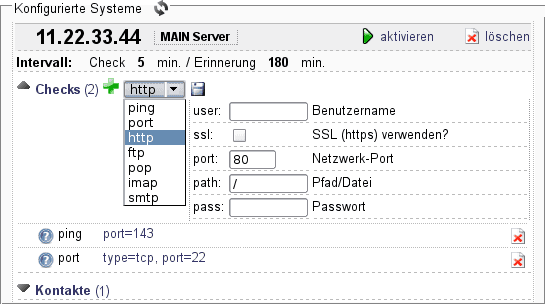
First, click on the small black arrow
 next to the Checks label of the system that you want to configure. This will show you a list of all the checks that you can add, as well as a green plus sign
 you can use to add individual checks.
Click on the plus sign, and from the menu that appears, choose the check type you want. When you have selected a check type, you will see different input fields, depending on the check type.

At the moment the following check types and settings are available:
ping- no parametersport- port: Network port
- type: TCP or UDP check - Note: A UDP check is not always possible (default=TCP)
http- port: Network port (standard=80), optional
- path: Path to the test file, eg. /test/index.php (default=/), optional
- hostname: Host or Domain name for the Host header, optional
- user: Username for basic authorization, optional
- pass: Password for basic authorization, optional
- ssl: Should SSL/https be used? - Please adjust the port if necessary (443). (default=no)
With the HTTP check, only the status codes 200, 301 and 302 are considered to be successful.
ftp- port: Network port (default=21), optional
- user: Username for the FTP server, optional
- pass: Password, optional
pop- port: Network port (default=110), optional
- user: Username for the POP server
- pass: Password
imap- port: Network port (default=143), optional
- user: Username for the IMAP server
- pass: Password
- ssl: Should SSL/https be used? - Please adjust the port if necessary (443). (default=no)
smtp- port: Network port (default=25), optional
- user: Username for the SMTP server, optional
- pass: Password, optional
- `dns
- port: Network port (default=53), optional
- type: Query type: ANY A PTR CNAME MX NS SOA HINFO AXFR TXT SPF DNSKEY CERT (default=ANY)
- zone: Zone/Domain name (default=hetzner.de)
The values in parentheses indicate the default value that is used if you don't specify anything.
For those checks for which you can enter login details (username/password), we recommend that you set up a separate user on the server with as few rights as possible and a secure password, and use it solely for the checks.
Editing checks
You can edit existing checks by clicking on the list of previously configured parameters of the respective checks. An entry form will appear with the existing data. You can edit the data and save the changes by clicking on the save button
 .
.
Link contacts to a system
First, click on the small black arrow
 next to the Contacts label of the system you want to configure. A list will open with the available contacts. Simply select the contact you want and confirm this by pressing the save button
 .
.

If you don't see any contacts, then that means you haven't configured any. If this is the case, then you first need to add contacts as described above.
Setting the check and reminder interval
For each of your systems, you can set specific time intervals for when you want SysMon to check your systems. In addition, you can also set the interval for when you want SysMon to remind you about a faulty system.
To change one of the intervals, click on the currently displayed interval — list of options will pop up. Make your choice and press the "OK" button.

To apply the settings, click on activate. Important note: In the event of an error during the check (for example, your server can not be reached with a ping check) the System Monitor will only show a failure and send an email at the second consecutive failure. On the one hand, this will protect you from false alarms. (For instance, you could be restarting a service right at the moment that the check happens.) On the other hand, it means that you will be informed of an error only after the second check. So if your check interval is 3 minutes, you will get a notification after 6 minutes.
Check the status
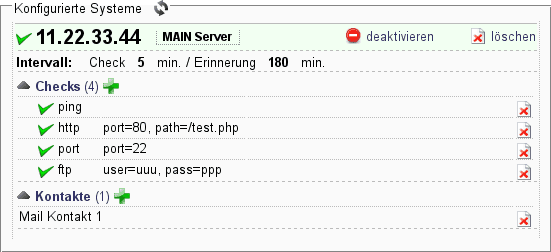
You can check the current status of the configured systems by reloading the page or by clicking on the update button
 at the top of the page:
