Because of their scalability and high-availability, Buckets are a great option for storing backups.
Kopia is an open-source, fast and secure backup program for local directories or files. It uses encryption to protect your backups, ensuring that only you can access the data. For more information about Kopia, see:
-
Create your credentials
For a step-by-step guide, see the getting started article "Generating S3 credentials".
Make sure you save the credentials in a safe location right after you create them. You cannot view the secret key again, neither via Hetzner Console nor via API.
-
Install KopiaUI
If you haven't already, install KopiaUI now. You can follow the official instructions at kopia.io.
-
Store the Kopia password
You can use
apg, the Advanced Password Generator, to create a random password. On Debian-based systems, you can install it withapt install apg.apg -a 1 -m 32 -n 1 -M NCLCopy the Kopia password from the output and save it locally.
-
Create a new backup repository
For this step, you need an existing Bucket (see the getting started "Creating a Bucket").
-
Open KopiaUI
-
Select "Amazon S3 or Compatible Storage" as repository
-
Set up the storage configuration
Replace
fsn1with the location of your Bucket.Bucket Server Endpoint Override Region your_bucket_namefsn1.your-objectstorage.com fsn1 Add your access key and secret key from step 1. You can leave the field for the session token empty.
Now click on "Next".
-
Provide the Kopia password
Enter the password you generated in step 3. Kopia will use the password to encrypt your data.
Important: During a restore, you have to enter this password again to decrypt the data. Please store it in a safe place — without it, you won’t be able to access your Kopia backups.
Now click on "Create Repository".
-
-
Setup backups
-
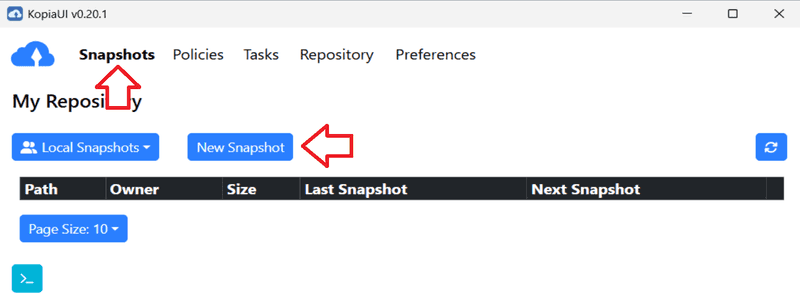
Make sure you're in the "Snapshots" tab and select "New Snapshot"
-
Select the local directory you'd like to backup
-
In "Scheduling", you can set when or how frequently Kopia should create backups of your selected directory.
-
Once you're happy with your settings, you can click on "Snapshot now" to create the first backup and save your settings.
Note that this setup is not persistent. The creation of backups will stop after the next system reboot, for example. For a persistent setup, see step 7 in "Setting up Kopia CLI".
-
-
View and restore backups
-
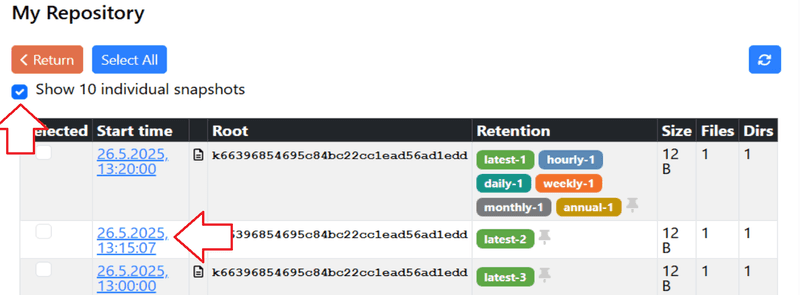
In the "Snapshots" tab, click on the "Path" of your snapshots. You should now see a list of snapshots.
-
In the top, enable "Show # individual snapshots" to view all snapshots.
-
Click on the "Start time" of one of your snapshots to view its contents. Here, you can also select the option to restore your files and directories to a local directory.
-
Until the next system reboot, your data should now be backed up automatically.