Use own subdomain
You can assign your own subdomain to the Storage Share via konsoleH. To speed up the setup process, we recommend that you do this next part 24 hours in advance.
Set up the DNS entry using the following guidelines:
- Source: Name of the subdomain (including main domain) with a dot (.) at the end
- Record type: CNAME
- Target: Complete predefined subdomain with a dot (.) at the end
As soon as you have successfully created the subdomain, you can switch to the menu tab New subdomain. There, add the complete subdomain to the input field and save it by clicking on "Add".
If you create the CNAME record in advance, konsoleH will immediately be able to request the SSL certificate from Let's Encrypt, and your setup time will be shorter.

Adding a subdomain in the DNS
Twenty-four hours in advance, you should add a CNAME entry for your subdomain on your Hetzner Console account, on your konsoleH account, or by using another DNS management service. (For example for: cloud.example.de):
On Hetzner Console
- Log onto Hetzner Console.
- Select the project that contains the DNS zone for your domain.
- In the left menu bar of the project, navigate to: Networking » DNS
- Choose the domain for your Storage Share that you want to add a subdomain for. In our example, that is
example.de. - In the section Add record, enter the following details:
When you are done, click on Add.
Type:    CNAME
Name:    cloud                        (first part of the subdomain)
Value:   nx*.your-storageshare.de.    (Make sure to add the . at the end)
TTL:     You can leave this empty to use the default.
On konsoleH
- Log onto konsoleH.
- Choose the domain for your Storage Share that you want to add a subdomain for. In our example, that is
example.de. - On the left, click on the following menu tabs Settings; Configuration; DNS Management.
- Then click on the button Add record and fill in the form using the following details:
- Host name: cloud (first part of the subdomain)
- Record type: CNAME
- Target: nx*.your-storageshare.de. (Make sure to add the . at the end)
- TTL: You can leave this blank.
Other DNS management service
Add the appropriate CNAME entry using the following details:
cloud.example.de. IN CNAME nx*.your-storageshare.de.
Note for Cloudflare users: If you happen to use Cloudflare to manage your DNS entries, make sure to switch off the Cloudflare proxy for the corresponding subdomain.
Add the subdomain to your Storage Share instance
Now that you have taken care of the steps above to set up the subdomain, you can actually add it to your Storage Share account:
- Log onto konsoleH.
- Choose the correct Storage Share instance.
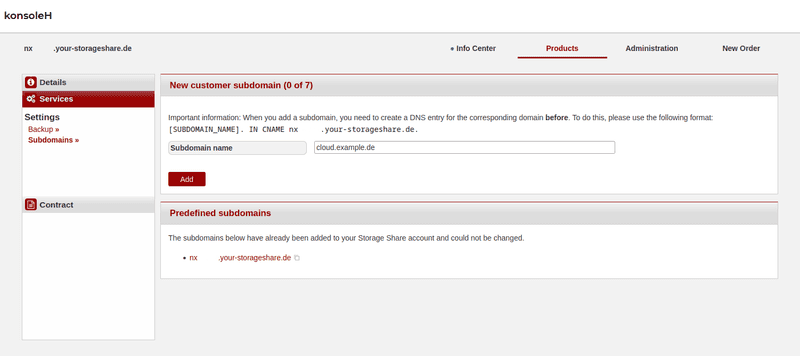
- On the left, click on the following menu tabs: Settings; Configuration; Subdomains.
New subdomain
Enter the complete subdomain that you want to add (for example cloud.example.de). Then click on Add.
konsoleH will automatically start the process for adding the subdomain. You can use the domain as soon as it has the status Active.
Existing subdomain
Here, you can see a list of all subdomains that you have already added with their current status.
After clicking on the subdomain, it will be opened in a new browser tab.
If there is any problem with the subdomain, it will be shown there too. You will receive some hints for how to solve the issue by clicking on "More information".
Predefined subdomains
In this area, you will find all subdomains that Hetzner provides for your account. These subdomains cannot be changed. By clicking on these, you can also open them in another browser tab.
Workaround for main domains
There is a workaround that will let you use your main domain. First, create a CNAME record for www.example.de and point it to your Storage Share. Then set up a redirect from example.de to www.example.de in your web hosting account or on your own server. Note: You may need to set up an SSL certificate for example.de.
On konsoleH
If you manage your domain using konsoleH, you can follow the guide below. But first, follow the both sets of instructions below for www.example.de:
- Add a subdomain in the DNS (Important note: Make sure to first delete the A record for the hostname
wwwfrom your DNS management interface.) - Actually add the subdomain to your Storage Share instance.
Setting up the redirect:
- Log onto konsoleH.
- Choose the correct main domain.
- On the left, click on the following menu tabs Services; Settings; Server Configuration.
- Next to the main folder that your domain points to (by default:
public_html), click on the configuration icon for.htaccess. - Using the Redirects button, you can set up the redirect for your domain and then save it by clicking on the
Addbutton.
Type: permanent
Target URL: https://www.example.de
Setting up the SSL certificate:
- To set up the SSL certificate for the main domain, go to Services; Extras; SSL Manager and then click on New Certificate.
- Select the SSL provider that you prefer, and then request a certificate for the main domain (not
*.example.de). Then remove the checkmark next to Include www subdomain entry.