Overview
You can attach Hetzner dedicated root servers to Hetzner Cloud Private Networks (Networks). This will enable cloud and dedicated root servers to reach each other via their private network links. For example, if you run your web frontends on cloud servers, and your database on a dedicated root server, you can use the private link to connect both. Note, however, that it is currently not yet possible to set up a dedicated server as router for the Private Network (see this FAQ entry).
Please note the limit of 1 vSwitch per Network.
Rough overview:
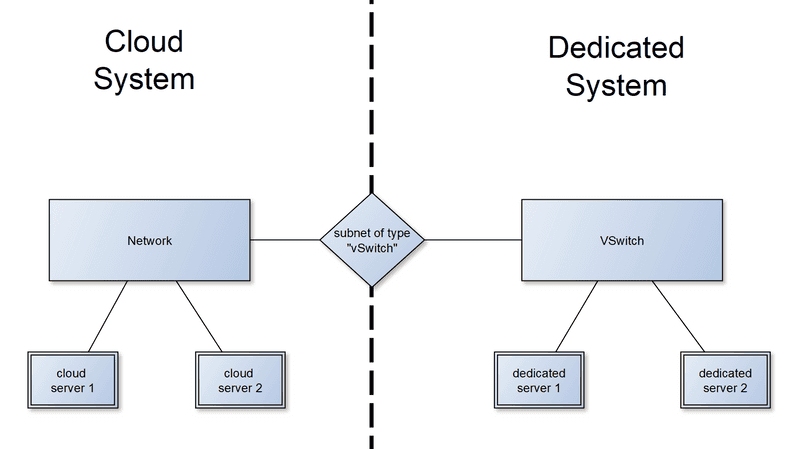
It works by using the existing private network mechanisms for both systems:
- For cloud servers, you create a "Network" and add your cloud servers to it.
- For dedicated root servers, you create a "vSwitch" and attach your dedicated root servers to it.
To couple both systems, you then create a Hetzner Cloud Network subnet, with a "vSwitch" connection, which links the existing cloud Network to the existing vSwitch. The network settings on the cloud servers are configured automatically. The dedicated root servers require a special network configuration inside their operating system for the coupling to work.
Details
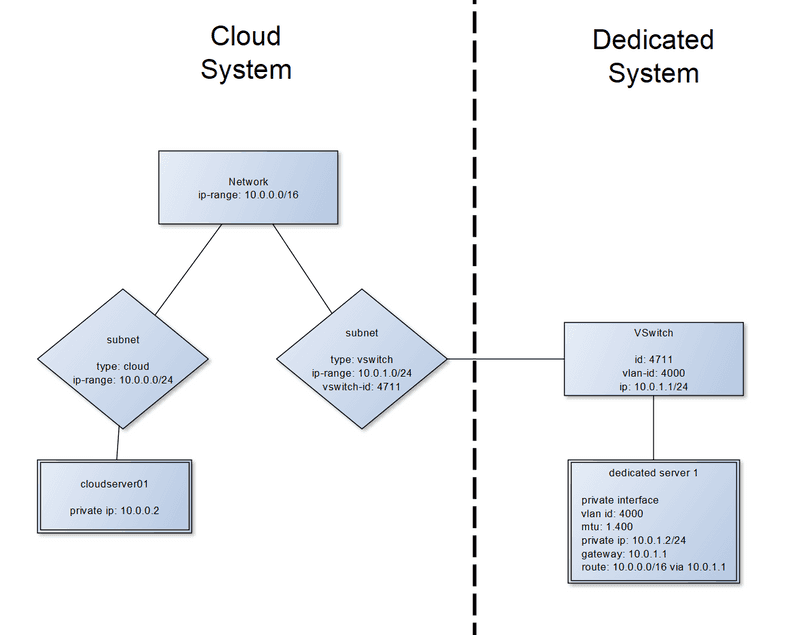
Example of a coupled configuration:
Assumptions in this document
For the rest of the document we will assume that:
- Your Cloud Network is
10.0.0.0/16with subnets:10.0.0.0/24for cloud servers.10.0.0.2is assigned to your cloud server.10.0.1.0/24for your vSwitch connection. Your dedicated root server uses IP10.0.1.2.
- You have a vSwitch with VLAN ID
4000. - Your dedicated root server has the network interface
enp0s31f6as its public network interface.
You might need to replace the values listed above with the actual values of your setup.
Attaching dedicated root servers to Cloud Networks
Prerequisites
On the cloud side
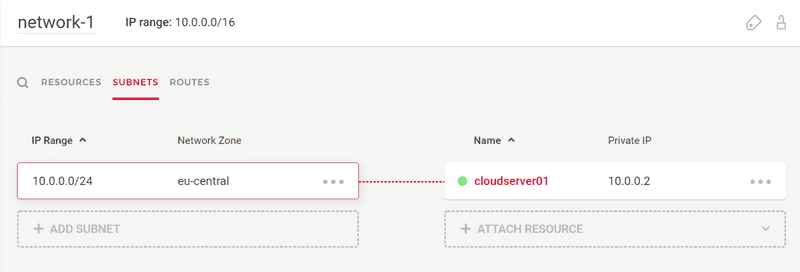
You must have an existing Cloud Network with attached cloud servers. The cloud servers must be able to ping each other using their private IP addresses.
A cloud server cloudserver01 attached to a Cloud Network looks like this:
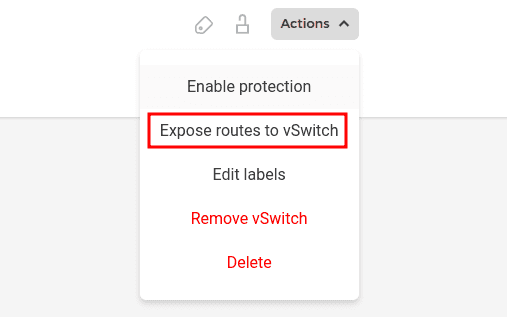
By default, only the IP addresses of cloud products are exposed via the vSwitch to the dedicated servers. If you want to expose the network routes (Cloud Network ➔ "routes" tab) too, you need to select "Expose routes to vSwitch" in the action menu of your network in the Hetzner Console. It can take several minutes for this change to be applied. Please note that the routes also need to be configured on the cloud products.
On the dedicated root server side
A dedicated root server vSwitch must already exist on Robot, and the relevant servers must be attached to it. However you shouldn't have done any private network configuration on the dedicated root servers yet. Follow this tutorial to create your vSwitch, but skip the part for configuring your server's operating system.
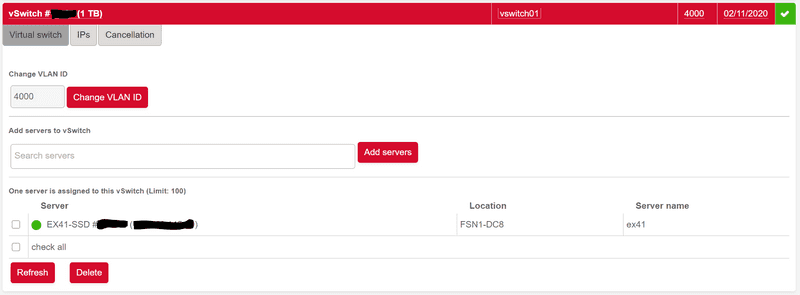
A vSwitch with VLAN ID 4000 and one attached dedicated root server called EX41-SSD will look like this:
Step 1: On Hetzner Console: Create subnet with an enabled vSwitch connection
Go to Hetzner Console, and then to 'Networks'. Click on your existing network and then on the 'Subnets' tab.
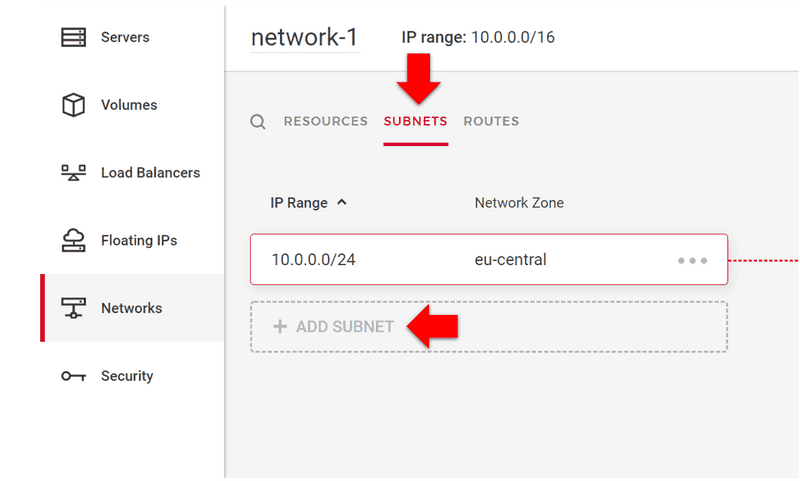
Click on 'Add subnet':
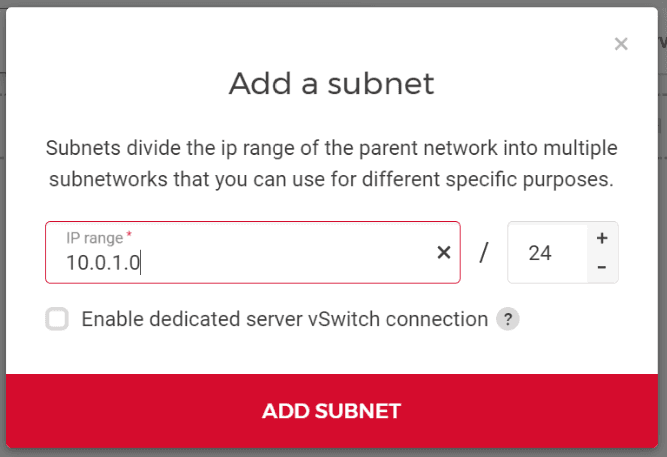
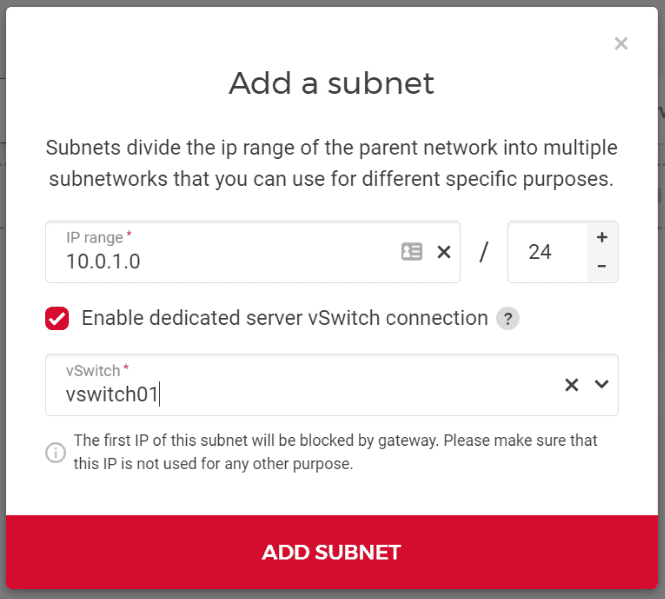
Check the box next to "Enable dedicated server vSwitch connection" and select the existing vSwitch you want to couple your private network with. You can also pick an IP range your dedicated root servers will use, or you can go with the default one. Make sure that the IP range does not include the first IP address of the private network, as it is reserved (see Are any IP addresses reserved?).
Afterwards, click "Add subnet". You will receive instructions on how to configure the network on your dedicated root servers:

You can either follow these instructions — making sure to replace the network interface name, the vSwitch VLAN ID, and the dedicated root server IP with the correct values — or you can manually execute them using Step 2 of this article.
Your Hetzner Cloud Network and the vSwitch should now be coupled.

Step 2: Configure networking on your dedicated root servers
For cloud servers, the network configuration inside your operating system is automatically done. For dedicated root servers, you need to do this configuration yourself. You can find the necessary steps for a non persistent configuration in the "Configuration of your dedicated root server" dialogue in Step 1. Step 1 also includes the reason for the configuration.
What we want to configure
-
Set up a network interface for the vSwitch VLAN (tagged VLAN packets) and configure an MTU of
1400. -
On that interface: Configure an IP address from the IP range of the vSwitch subnet (
10.0.1.2in the example above) and set the first IP address of that subnet as a gateway (10.0.1.1in example). Make sure that every dedicated root server uses its own, unique private IP address. -
Configure a route for the network IP range pointing to the gateway (
10.0.0.0/16 gw 10.0.1.1in example above)
Persistent example configurations
Interface enp0s31f6 (usually called eth0, enp6s0 or enp0s31f6), VLAN 4000
Cloud network: 10.0.0.0/16
Cloud server subnet: 10.0.0.0/24
vSwitch server subnet: 10.0.1.0/24 and 10.0.1.2 for your Dedicated Server
vSwitch VLAN: 4000
Example Debian configuration
# /etc/network/interfaces
auto enp0s31f6.4000
iface enp0s31f6.4000 inet static
  address 10.0.1.2
  netmask 255.255.255.0
  vlan-raw-device enp0s31f6
  mtu 1400
  up ip route add 10.0.0.0/16 via 10.0.1.1 dev enp0s31f6.4000
  down ip route del 10.0.0.0/16 via 10.0.1.1 dev enp0s31f6.4000
Example configuration using netplan (Ubuntu 20.04 or higher)
Installation via installimage will create a network configuration using netplan on Ubuntu 20.04 or higher. To set up the VLAN, you need to change the netplan file:
#/etc/netplan/01-netcfg.yaml
### Hetzner Online GmbH installimage
network:
  version: 2
  renderer: networkd
  ethernets:
    enp0s31f6:
      addresses:
...
  vlans:
    enp0s31f6.4000:
      id: 4000
      link: enp0s31f6
      mtu: 1400
      addresses:
        - 10.0.1.2/24
      routes:
        - to: "10.0.0.0/16"
          via: "10.0.1.1"
After that, execute the following commands and the network should be available:
sudo netplan generate
sudo netplan apply
Example configuration for systemd-networkd
Create two new files for systemd-networkd:
#/etc/systemd/network/10-enp0s31f6.4000.netdev
[NetDev]
Name=enp0s31f6.4000
Kind=vlan
MTUBytes=1400
[VLAN]
Id=4000
#/etc/systemd/network/10-enp0s31f6.4000.network
[Match]
Name=enp0s31f6.4000
[Network]
Description="VLAN 4000"
Address=10.0.1.2/24
[Route]
Gateway=10.0.1.1
Destination=10.0.0.0/16
GatewayOnlink=yesIn newer systemd versions (v242+), you have to use the option (GatewayOnLink, upper case L) in the last line.
Add the following line into file:
#/etc/systemd/network/10-enp0s31f6.network
....
[Network]
...
VLAN=enp0s31f6.4000
Restart service:
sudo systemctl restart systemd-networkdStep 3: Test
The example values in this section reflect those of the 'Assumptions' chapter above.
3.1: Ensure that network configuration looks right on your cloud server
Run the command to show your routes:
ip route show10.0.0.0/16 via 10.0.0.1 dev ensXX
10.0.0.1 dev ensXX scope link3.2: Ensure that network configuration looks right on your dedicated root server
Run the command to show your routes:
ip route showIt should include the following lines:
10.0.0.0/16 via 10.0.1.1 dev enp0s31f6.4000
10.0.1.0/24 dev enp0s31f6.4000 proto kernel  scope link  src 10.0.1.2
3.3: Cloud server should be pingable from dedicated root server
From your dedicated root server, ping the cloud server IP address:
$ ping 10.0.0.2
PING 10.0.0.2 (10.0.0.2) 56(84) bytes of data.
64 bytes from 10.0.0.2: icmp_seq=1 ttl=62 time=26.6 ms
...