Introduction
With the vSwitch feature, Hetzner Online has created a tool for your dedicated root servers that lets you connect your servers in multiple locations to each other using virtual layer 2 networks. On your account on the Robot administration interface, you can create and configure vSwitches using the "vSwitches" button in the server overview.
The vSwitch uses the uplink of your server. An additional NIC is therefore not necessary.

How do I setup a vSwitch?
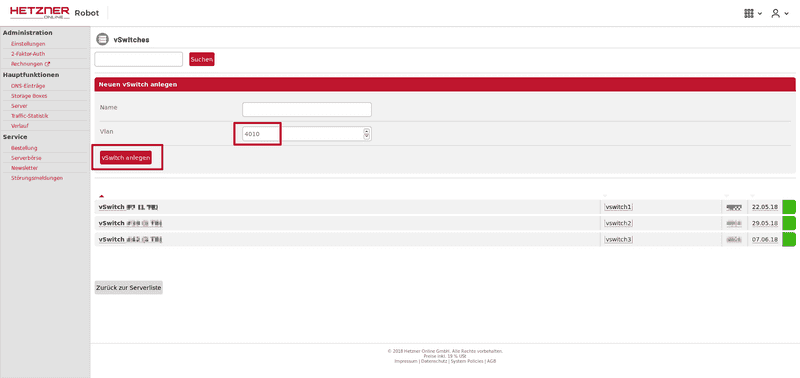
You can create a vSwitch on Robot by going to Main functions -> Server -> vSwitches. Then assign a name and a VLAN ID to your vSwitch. The VLAN ID can range from 4000 to 4091.
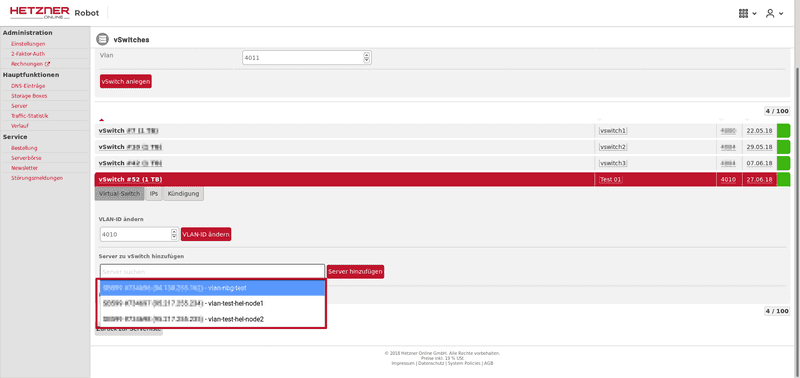
After you have created the vSwitch, you can then assign your dedicated root servers to the vSwitch using the Add server button. Then the servers that you have added can communicate with each other using the VLAN ID that you have set.
The server's main IP address and the additional IP addresses +/or subnets can still be reached without doing VLAN tagging.
There is a limit of 32 MAC addresses per physical switch port.
Note: You can use random MAC addresses on vSwitch with private IP addresses without any issues.
You can assign up to 100 servers to a vSwitch.
You can assign up to 5 vSwitches to a server.
IP addresses
You can use any private IP addresses for free within the VLAN. Plus, you can order additional public subnets (IPv4 and IPv6) by going to the IPs menu tab. You can use these subnets on all servers that you assign to your vSwitch.
Please see the price overview here.
Traffic
Internal traffic (across locations) is free of charge. For the public subnets, vSwitches have an included traffic limit of 1TB per month. Each additional TB costs € 1.00 ($ 1.20) per month (excl. VAT). We at Hetzner only count outgoing traffic for this price; incoming and internal traffic is free.
Important note: The main NIC is used for vSwitch traffic. An additional NIC for the vSwitch function is not necessary.
Firewall
The servers' firewall is also applied to the packets of the vSwitches. Important note: If you have activated a firewall, you must also enable internal IP addresses in the firewall.
Server configuration (Linux)
For the vSwitch, you need to configure an interface with the VLAN ID that you have entered on Robot. You should limit the MTU of the interface to 1400.
Example configuration for the network card enp0s31f6, with the VLAN ID 4000
Create a VLAN device
ip link add link enp0s31f6 name enp0s31f6.4000 type vlan id 4000
ip link set enp0s31f6.4000 mtu 1400
ip link set dev enp0s31f6.4000 up
Configure IP address <192.168.100.1> from the private subnet <192.168.100.0/24>
ip addr add 192.168.100.1/24 brd 192.168.100.255 dev enp0s31f6.4000Public subnet You need to create an additional routing table for the public subnet so you can configure another default gateway.
Example configuration for IP <213.239.252.50> from the public subnet <213.239.252.48/29>, Interface enp0s31f6.4000
echo "1 vswitch" >> /etc/iproute2/rt_tables
ip addr add 213.239.252.50/29 dev enp0s31f6.4000
ip rule add from 213.239.252.50 lookup vswitch
ip rule add to 213.239.252.50 lookup vswitch
ip route add default via 213.239.252.49 dev enp0s31f6.4000 table vswitch
Example Debian configuration
Interface enp0s31f6, VLAN 4000, private network
# /etc/network/interfaces
auto enp0s31f6.4000
iface enp0s31f6.4000 inet static
  address 192.168.100.1
  netmask 255.255.255.0
  vlan-raw-device enp0s31f6
  mtu 1400
Add IP <213.239.252.50> from public subnet <213.239.252.48/29> and IPv6 <2001:db8:61:20e1::2> from public subnet <2001:db8:61:20e1::/64> on the host system.
Create an additional routing table.
echo "1 vswitch" >> /etc/iproute2/rt_tables# /etc/network/interfaces
auto enp0s31f6.4000
iface enp0s31f6.4000 inet static
address 192.168.100.1
netmask 255.255.255.0
vlan-raw-device enp0s31f6
mtu 1400
# ipv4 subnet
up ip addr add 213.239.252.50/29 dev enp0s31f6.4000
up ip rule add from 213.239.252.50 lookup vswitch
up ip rule add to 213.239.252.50 lookup vswitch
up ip route add default via 213.239.252.49 dev enp0s31f6.4000 table vswitch
down ip addr del 213.239.252.50/29 dev enp0s31f6.4000
down ip route del default via 213.239.252.49 dev enp0s31f6.4000 table vswitch
down ip rule del to 213.239.252.50 lookup vswitch
down ip rule del from 213.239.252.50 lookup vswitch
# ipv6 subnet
up ip -6 addr add 2001:db8:61:20e1::2/64 dev enp0s31f6.4000
up ip -6 rule add from 2001:db8:61:20e1::2 lookup vswitch
up ip -6 rule add to 2001:db8:61:20e1::2 lookup vswitch
up ip -6 route add default via 2001:db8:61:20e1::1 dev enp0s31f6.4000 table vswitch
down ip -6 addr del 2001:db8:61:20e1::2/125 dev enp0s31f6.4000
down ip -6 route del default via 2001:db8:61:20e1::1 dev enp0s31f6.4000 table vswitch
down ip -6 rule del to 2001:db8:61:20e1::2 lookup vswitch
down ip -6 rule del from 2001:db8:61:20e1::2 lookup vswitchExample configuration for systemd
Interface enp0s31f6 (usually called eth0, enp6s0 or enp0s31f6), VLAN 4000, private network
Create two new files for systemd-networkd:
#/etc/systemd/network/10-enp0s31f6.4000.netdev
[NetDev]
Name=enp0s31f6.4000
Kind=vlan
MTUBytes=1400
[VLAN]
Id=4000
#/etc/systemd/network/10-enp0s31f6.4000.network
[Match]
Name=enp0s31f6.4000
[Network]
Description="VLAN 4000"
Address=192.168.100.2/24Add the following line into file:
#/etc/systemd/network/10-enp0s31f6.network
....
[Network]
...
VLAN=enp0s31f6.4000
Restart service:
sudo systemctl restart systemd-networkdExample configuration systemd and netplan (e.g.Ubuntu 18.04)
Newer instances of installimage create netplan-based network configurations on Ubuntu 18.04. The /etc/systemd/network/ directory will be empty. To set up the VLAN, you need to change the netplan file:
#/etc/netplan/01-netcfg.yaml
### Hetzner Online GmbH installimage
network:
  version: 2
  renderer: networkd
  ethernets:
    enp0s31f6:
      addresses:
...
  vlans:
    enp0s31f6.4000:
      id: 4000
      link: enp0s31f6
      mtu: 1400
      addresses:
        - 192.168.100.2/24
After that, you need to execute the following commands. Then the network should be available:
sudo /lib/netplan/generate
sudo systemctl restart systemd-networkd
There appears to be a glitch with netplan and the MTUs. (See https://askubuntu.com/questions/1191365/netplan-not-applying-correct-mtu-to-vlan). You need to set these manually using ip command:
sudo /sbin/ip link set mtu 1400 dev enp0s31f6.4000If you want to persist this configuration across a reboot, it helps to make an entry in crontab (for example, in the one from root, so run sudo crontab -e):
@reboot sleep 10 && /sbin/ip link set mtu 1400 dev enp0s31f6.4000Server configuration (Windows)
See VSwitch for Windows Server.
API
You can also configure vSwitches via the API.
Troubleshooting vSwitch connection issues
If there is connections issues with the vSwitch the first step of troubleshooting is to restart (refresh) the vSwitch. This is done by the following steps:
1: Login to Robot and select Servers on the left side, then select the tab vSwitch. 2: Select the vSwitch in question for example #99999. 3: Press the "Select all" button at the bottom and click on the button Refresh.
If this doesn't resolve the issue, please remove all the servers from the vSwitch and add them back again. If the issue still persists the issue needs to be escalated so please create a support ticket and list the steps you taken to troubleshoot the issue.