What are the shared resource server plans?
In plans (CX, CPX, CAX) with shared resources the compute resources are distributed among all instances on the same physical server. These instances provide a baseline CPU performance and have the option to temporarily burst CPU usage above the baseline level. This allows us to provide these shared plans to you at a much lower price.
What are the dedicated resource server plans?
Plans (CCX) with dedicated resources have their CPU resources exclusively. Here one vCPU equals one thread of a physical CPU core. Instances with dedicated resources offer continuous and predictable high CPU performance. We recommend them for systems with high production loads and CPU intensive applications. They run on high-performance hardware and come with a generous allocation of I/O and network power.
All Hetzner Cloud features are available for dedicated resource instances. Using the rescale feature on the administration interface Hetzner Console, you can also rescale to and from a plan with shared resources or up- and downgrade to another plan depending on how many resources you require.
Please note that our System Policies at https://www.hetzner.com/rechtliches/cloud-server/ also apply to our dedicated resource instances.
Can I choose the CPU type of mixed (Intel®&AMD) server plans?
CX plans can run on either Intel® or AMD. You can not choose the CPU type yourself. The hardware is automatically allocated based on availability — both during the creation of new servers, and during a rescale to a different plan. As a result, the CPU type (Intel® or AMD) may change during a rescale.
What limits come with the architecture types?
The architecture type of the server is relevant when you:
- Create a new server from a Backup/Snapshot.
- Attach an ISO image to the virtual drive in your server.
- Change the server plan ("Rescale").
In those three cases, it is not possible to work with two different architecture types. If you want to create a new server from a Backup/Snapshot, you have to use a Backup/Snapshot that has the same architecture type as the server. If you want to mount an ISO image, you have to select an ISO image that supports the architecture type of your server. And finally, when you rescale your server, you can only change to a server plan with the same architecture type as your current server plan.
Do all servers have a public network?
No, they do not if you don't want them to! When creating a server, you can choose from three network options. This means that you can decide if you want your server to have no public IP addresses, one public IP address (IPv4 or IPv6) or two public IP addresses (IPv4 and IPv6). When creating a server, you need to select at least one of these three options. If you choose to create a server without public IPs (IPv4, IPv6), the server will have to be in a private network and it will not be connected to the public network. This can be a good choice if you do not need or want an internet connection and if the server's security is important to you.
| Option | ||
|---|---|---|
| Private network | no Primary IP | at least one private IP |
| Public network | one Primary IP (IPv4 or IPv6 ) | private IP optional |
| Public network | two Primary IPs (IPv4 and IPv6) | private IP optional |
It is possible to assign or remove Primary IPs after a server was created, but the server has to be in the power state "off". Also, to assign a Primary IPv6 after the initial server creation, you need to do a basic manual configuration on the server.
How do IPv6-only cloud servers work?
IPv6-only cloud servers have a public network, but no public IPv4 connectivity.
Restrictions for IPv6-only servers:
-
No public IPv4 connectivity
-
No Load Balancer (public IPv6 address)
Load Balancers only support IPv4 addresses (public and private) as targets. You can use a private IPv4 to add an IPv6-only server as a target. The server only needs to be in the same private network as the Load Balancer.
How do private-network-only cloud servers work?
Servers without public IPs (IPv4, IPv6) have to be in a private network and are not connected to the public network.
Restrictions for servers without Primary IPs:
- No public IPv4 and IPv6 connectivity
- No Floating IPs (IPv4 and IPv6)
- No Firewalls
- No rescue system
Is it possible to remove the Primary IPs of all servers?
Yes, it is possible to remove the public IPs of all servers. This even includes cloud servers that were created before the introduction of Primary IPs.
If you want to change the Primary IPv6 after a server's initial creation, you need to do a basic configuration. For more information, see Primary IP configuration
Why can I not connect to my IPv6-only cloud server?
In terms of IPv6, the cloud server is always assigned a /64 network.
Example: 2001:db8:5678::/64
By default, we assign the first address from this network to the cloud server.
Example: 2001:db8:5678::1
To use the address to connect to your server via SSH, for example, you will have to enter it like this:
ssh root@2001:db8:5678::1
Please replace
2001:db8:5678with your own IPv6 address.
If this does not work, please check whether your client or your Internet connection is IPv6-capable. This can be done here: https://ipv6-test.com/
If you still have problems logging in, please check the logs of your cloud server. Login is always possible via the Console on your Hetzner Console and via a private IP.
If the Primary IPv6 was assigned after the initial server creation, please check the configuration on the server. You can use the Console on your Hetzner Console and a private IP to connect to the server.
Can I use Floating IPs instead of Primary IPs?
No, it is not possible to assign Floating IPs to servers that do not already have a Primary IP of the same type (IPv4, IPv6). This is the case because Floating IPs require public IP connectivity, and servers that do not have Primary IPs do not have public connectivity.
- Servers with a Primary IPv4 have public IPv4 connectivity.
- Servers with a Primary IPv6 have public IPv6 connectivity.
Servers without Primary IPv4 and IPv6 do not have public IP connectivity.
How can I get a custom ISO?
Please note that the ISO image has to support the architecture type of your server. Therefore, remember to check which architecture types (
x86/Arm64) your ISO image supports before you send us the link.More information about the architecture type
For a server with the architecture type
x86, you will need an ISO image that supportsx86. For a server with the architecture typeArm64, you will need an ISO image that supportsArm64.
x86<—>Cloud Server
x86ISO image
Arm64<—>Cloud Server
Arm64
To mount your ISO image, you will have to send us the link for a direct download of the ISO. If you send us an Arm image, please mention this in your ticket too.
Please do not send us the link to the file (e.g. on Google Drive), but a link for a direct download. The link should not require us to select files or do anything manually for a download. If you are using Google Drive, for example, please change your Google Drive link into a link for a direct download. Below, you can find a short explanation on how this can be done.
You can send us the deeplink to the .iso file via the Hetzner Console. In your project overview, simply select "Support" on the upper menu bar and choose "Miscellaneous" as your support request type.
Please also note that we do not support Windows ISOs (see this FAQ), or OS that have already reached end-of-life (EOL), see this FAQ.
-
Convert Google Drive link into a link for a direct download
Right-click on your ISO file. Select "Share". This will open a new window. At the bottom of the window, in the "Get link" section, you can now select "Change to anyone with the link" and copy the link.
The link should look like this:https://drive.google.com/file/d/<your-file-id>/view?usp=sharingCopy the unique ID of your ISO file. The unique ID is the part between
d/and/view.
Next, in the URL below, replace<your-file-id>with the unique ID that you just copied.https://drive.google.com/uc?export=download&id=<your-file-id>
Can I use Windows 10/11 on a server?
No, the Windows End User License Agreement (EULA) explicitly forbids using Windows 10 or 11 on server hardware. This isn’t a gray area or a technicality — Microsoft has made it abundantly clear.
[…]
(iv) Use the software as server software or for commercial hosting, make it accessible to multiple users over a network, install it on a server for remote access, or install it on a device meant exclusively for remote users;
[…]
We are not a "Qualified Multitenant Hoster" (QMTH). As a result, Enterprise and Education editions of Windows 10/11 fall under the same restrictions.
Simply put:
-
We do not and cannot provide Windows 10/11 ISO files for you.
Alternatives:
-
Windows Server editions — They were specially developed for use on servers and are licenced accordingly.
Can I use an OS that already reached end-of-life?
No, we don't provide operating systems that have reached their end of life. An operating system that is no longer receiving updates from the manufacturer may appear to be working fine, but behind the scenes, the security risk is growing by the day. We understand that there may be reasons for not taking immediate action. However, out of a sense of responsibility to our customers and the wider Internet community, we feel compelled to highlight the following:
Specific risks:
-
Increased Risk of Cyber Attack
Malicious actors are actively looking for systems with known vulnerabilities that are no longer patched by the vendor. A successful attack can result in significant damage, data breaches, and service disruptions. -
Resource abuse
Compromised systems are often used as launch pads for further attacks. By using outdated software, you not only put your own data at risk but also indirectly put other users and Internet services at risk. -
Reputation and accessibility
Servers found to be vulnerable often end up on blacklists, severely damaging your reputation and potentially making your services unavailable. -
Compliance and legal risks
Many industries have strict regulatory requirements for secure IT systems. Running out-of-date software could violate these regulations, exposing your organization to compliance risks and potential legal consequences.
Real-World Example: WannaCry
A prominent example is the WannaCry ransomware attack in 2017, in which 98% of affected computers were running an end-of-life version of Windows 7. This incident highlights how quickly outdated operating systems can become a serious security threat.
For these reasons, we do not offer end-of-life operating systems as a pre-installed option. In addition, we do not allow the uploading of ISO files of obsolete operating systems.
Ultimately, ensuring a stable and secure IT environment is a shared responsibility for all of us.
Why does my FreeBSD system (pfSense, OPNsense) have a constant 100% load?
If your FreeBSD system constantly has a load of 100%, you should check the following information:
-
Check information about the system:
kenv | grep smbios.planar.product -
Check the WCPU usage of
rand_harvestqtop -SP
If the output of the first command mentions "Q35", and the WCPU usage of rand_harvestq is about 100%, you can resolve the issue by following these steps:
-
Reboot your server.
-
During the boot process, switch to the loader prompt.
At the end of the third phase of the boot process, the boot process should pause for about 10 seconds in which you can choose from a few different options. One of those options should be:
3. Escape to loader promptIn the loader prompt, run the following commands to deactivate
virtio-randomand continue the boot process afterwards:set hint.vtrnd.0.disabled=1 bootClick here to view an example
Type '?' for a list of commands. 'help' for more detailed help.
OK set hint.vtrnd.0.disabled=1
OK boot
Loading kernel ...
In the file /boot/device.hints, you can save this setting permanently:
hint.vtrnd.0.disabled=1On OPNsense, the file /boot/device.hints may be modified during updates. Add the setting to the file /boot/loader.conf.local instead.
Is secure boot supported?
No, we do not support "secure boot" on our cloud servers.
Do the cloud servers support vTPM or TPM?
No, our cloud servers do not support vTPM (Virtual Trusted Platform Module) or TPM (Trusted Platform Module).
How does Rescue work?
The Hetzner Rescue System is a Debian based Linux live environment that allows you administrative access to your server, even if the installed system does not boot anymore. The environment starts using network boot (PXE) and runs in the memory of the server, without touching the drives or your data on them. This makes it possible for you to carry out repairs to the installed system, access the data on the drives, create backups, and to install operating systems. Plus, you can install any other software you need using the Rescue System.
How to use Rescue:
- Check out our getting started to learn how to activate and use Rescue.
- If you rescale your cloud server, you will have to manually resize the partition via Rescue System. The tutorial Resize EXT Partition explains how to do that.
Can I use Cloud-Init when creating servers?
While creating your server, you can inject cloud-init user data. This means you can make your server execute special commands while booting, like creating users or running a shell command.
Example:
#!/bin/bash
touch /tmp/cloudinit_was_here
For more examples see https://help.ubuntu.com/community/CloudInit and https://cloudinit.readthedocs.io/en/latest/topics/examples.html
In order for cloud-init to work, you must use the system images we provide as they include a special cloud-init datasource.
Can I pick my Backup time?
In the past there used to be an option to pick a time yourself, however, we had to deactivate this feature. This allows us to better spread the additional load caused by running Backups throughout the day. It was necessary because many users picked the same time, causing performance repercussions and negatively impacting server performance during certain times of the day.
You can use our Snapshot feature if you want to precisely control when your disk gets saved.
Is it possible to downgrade the disk?
No, you can only rescale to server plans with a disk size equal to or larger than the current disk of your server. Rescaling to a plan with a smaller disk is not possible, regardless of how much storage you are actually using.
When scaling up, you can choose to keep your current disk size. This allows you to later downgrade to a server plan with the same disk size.
Technical background:
Just like physical disks, virtual disks are divided into partitions. Data is stored in a file system on one or more partitions, which can also be encrypted. To reduce the disk size, it is necessary not only to move the data but also to shrink the file systems and partitions. This process is technically complex and carries a high risk of data loss. In addition, depending on the situation, the virtualization platform may require knowledge or software that it does not have. For this reason, we do not offer disk downgrades.
How can I increase the primary disk of my cloud server?
Cloud servers primary disks are bound to their respective plan. In order to increase the primary disk, you have to Rescale the server.
How can I reset my server to its delivery state?
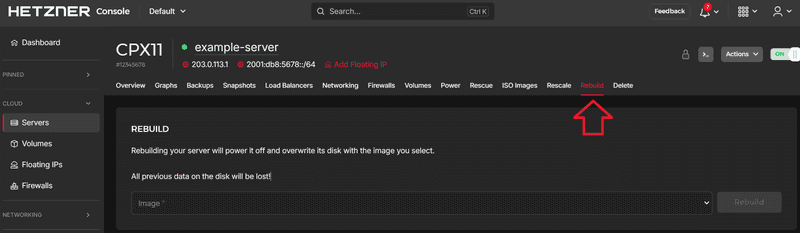
In order to reset the server to its delivery state, please select the server and then Rebuild. Next, select and restore the desired OS.
Important note: All saved data will be lost.
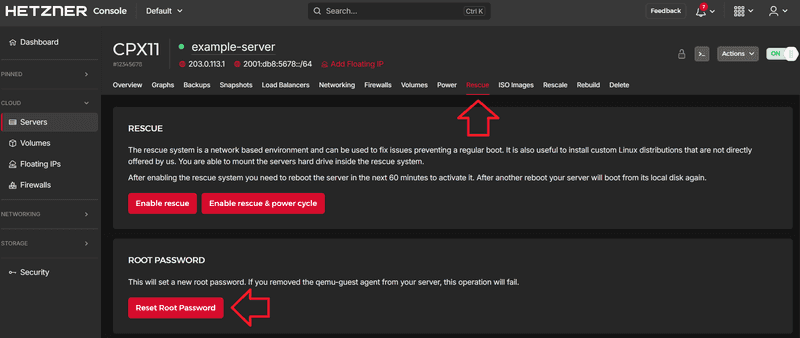
How can I reset my root password ?
First select your Project then the Server. In the upper navigation bar click on Rescue. At the bottom of the page you will find a button called "Reset Root Password".
Is root password authentication disabled on servers that are created with an SSH key?
With most of the older operating systems, you can set a root password, even if you created your server with an SSH key. Newer versions of most operating systems (e.g. Debian 11, Ubuntu 22.04) recognized the vulnerability to brute force attacks that comes with this approach and disabled password authentication for the root user by default.
If you still want to enable password authentication, you can change the settings as explained below, for example:
nano /etc/ssh/sshd_config-
Root passwort authentication is disabled
PermitRootLogin prohibit-password -
Root passwort authentication is allowed
PermitRootLogin yes
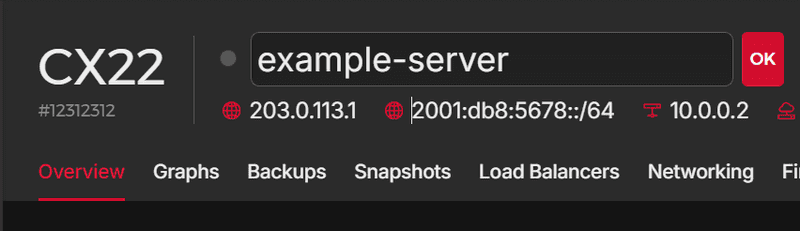
How can I rename a server?
Navigate to the server you want to rename. In the top left, click the server's name and edit it. After you added a new name, click "OK" to save your changes.
Note that this will not change the hostname in your host's operating system. If you want to change the hostname too, you have to do it manually. For additional reference, see the tutorial "Check and change hostname on Debian".
How can I reinstall a server?
We recommend deleting the server completely and creating a new one instead. This ensures that all settings are new and up to date.
You can keep the public IP address of your old server and use it for the new one. To do this, make sure that your Primary IP does not have “auto delete” enabled, or simply remove the Primary IP from the server before you delete the server. You can then assign the IP to the new server.
How can I access the server I rebuilt?
Assume you have rebuilt your server server1 from a Snapshot called snap1.
Case 1: Server1 was originally created without selecting an SSH key:
After rebuild, a new root password for server1 will be generated and mailed to you. It will be set on first boot using the cloud-init mechanism.
If snap1 contained injected SSH keys, these will also continue to work.
Case 2: Server1 was created with selecting your SSH key key1:
After rebuild, the key key1 will be injected into server1 on first boot using the cloud-init mechanism. You can use key1 to access your server.
If snap1 contained any more keys in its authorized_keys file, you can also still use these to access server1.
In all cases, server1 cannot be accessed using a root password directly after the rebuild, even if one was set in snap1.
Case 1 and Case 2 only apply if you restore a Snapshot that was taken from our officially provided images. If you used the rescue system or other means to install the server snap1 was taken from, it will not be fit for reconfiguration via cloud-init, and its behavior might be different.
Why has the disk partition remained the same after rescaling?
You have to manually resize the partition via Rescue System after the Rescale has been completed. Following community article can help further in this case: https://community.hetzner.com/tutorials/resize-ext-partition?title=Resize_Ext_Partition/en
Can I run virtual machines on cloud servers, or rather is nested virtualization possible?
No, this is not possible on cloud server.
While creating a new server, I have selected a Snapshot as source image. How can I access this server?
Assume you have created your server server1 from a Snapshot called snap1.
Case 1: You did not select an SSH key while creating server1:
After server creation, a root password for access will be generated and mailed to you. It will be set using the cloud-init mechanism.
If snap1 contained injected SSH keys, these will also continue to work.
Case 2: You selected SSH key key1 while creating server1:
After server creation, the key key1 will be injected into server1 using the cloud-init mechanism. You can use key1 to access your server.
If snap1 contained any more keys in its authorized_keys file, you can also still use these to access server1.
In all cases server1 cannot be accessed using a root password directly after its creation, even if one was set in snap1.
Case 1 and Case 2 only apply if you use a Snapshot that was taken from our officially provided images. If you used the rescue system or other means to install the server snap1 was taken from, it will not be fit for reconfiguration via cloud-init, and its behavior might be different.
The keyboard mapping in the console window seems to be wrong. How can I fix this?
All of our images come with keyboard mapping set for a US keyboard. If you have something different, you need to configure it yourself within your server.
For example, on Ubuntu you can do so by running
sudo dpkg-reconfigure keyboard-configurationand selecting the keyboard layout you are using on your local PC. After a reboot, the keyboard mapping in the console will be correct.
If rescue is active, the default keyboard layout matches the server's location. For example, a server in Helsinki uses the Finnish (fi) layout in rescue.
Why is my server powered on automatically?
In some rare cases, a server may be automatically powered on after a live migration.
Normally, the server's original state (powered on/off) is known and restored after the migration.
However, in certain exceptions, such as a hardware failure on the physical host of the cloud server, the original state may be unknown. In these cases, the server is automatically powered on after the live migration since we generally assume that an existing server is intended to be running.
If a server is not needed and should remain powered off permanently, it is recommended to delete it. To preserve important data or allow future access, you can unassign the Primary IPs and create a Snapshot before deleting the server.
If you don't want to delete your server, you can instead remove all IPs (both private and public). This ensures that the server is not powered on unexpectedly because at least one network interface is required to power on the server.
For more information about when live migrations are performed, see this article.
How do I protect my server from being deleted by accident?
Servers, Snapshots and Floating IPs can be protected in the Hetzner Console and API.
Before you can delete a protected resource, you have to deactivate the deletion protection. This provides an additional safeguard for accidental deletion.
Protected resources are indicated by a lock icon on the server, Snapshot and Floating IP overview page. You can't use the "Rebuild" feature to reinstall a protected server.
How can I change the location of my server?
It is not possible to change the location of an existing server. When you create a new server in the desired location, you can, however, choose to use a Snapshot or Backup of the existing server. The new server will then be a direct copy of the existing server.
-
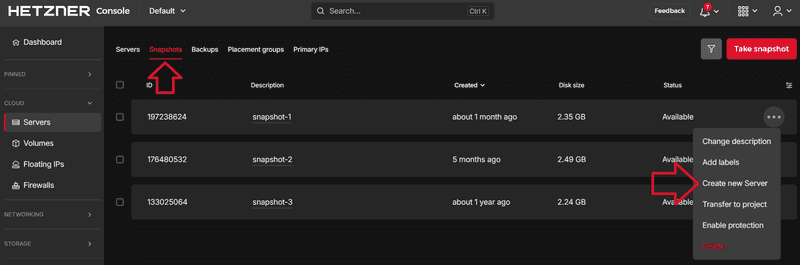
Use a Snapshot to create a copy of the server
When you select "Add server" on your project overview, you will be able to select a Snapshot during server creation. The server will then contain all the information and data that was saved on that Snapshot.Alternatively, you can also create a new server directly from your Snapshot as shown in the image below.
Make sure that your Snapshot is up to date. Changes that have been made on the server after the Snapshot was created, are not included in the Snapshot.
-
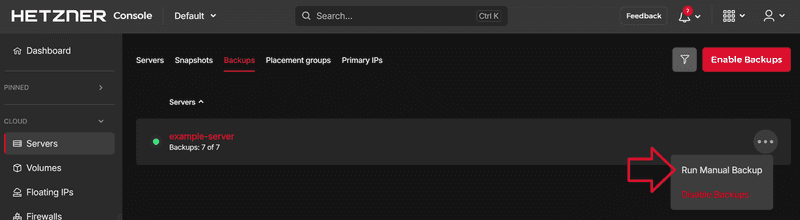
Use a Backup to create a copy of the server
If you have Backups enabled for your server, you can use the latest one to create a new server in the desired location.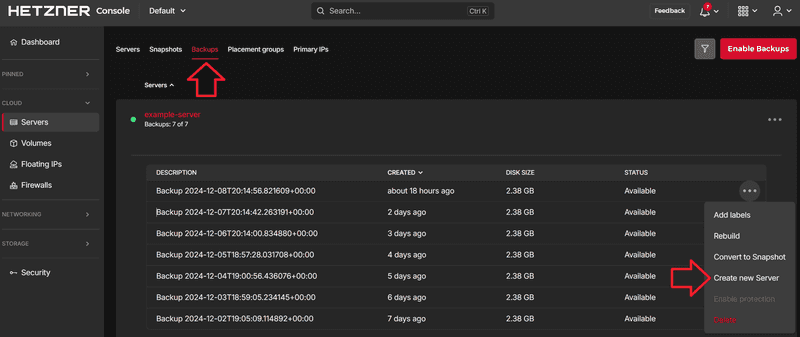
If the latest Backup is not up to date enough, you can create a new Backup manually. You can then use this Backup to create the new server in the desired location.
How many servers can I create?
Each customer has a default limit for the number of cloud resources that we simultaneously provide. If this limit is reached, no new resources can be created. If you would like to increase your limit, you can send a request on your Hetzner Console. To create a new request, navigate to your limits overview and select Request change → Limit increase at the top right. Please note that this is only possible if you have been with us for a month and paid your first invoice. Our team will quickly review your request and, if everything is in order, they will increase your limit.
What does it mean if an image is marked as deprecated?
When creating a server, you can select from a list of pre-made operating system images, such as Debian version 11. When the end of the lifecycle of this specific image version comes closer, we will mark it as deprecated.
This means that the image is still available. However, we will remove it in the future.
We will keep images marked as deprecated for at least another 3 months after the deprecation date. After that period, they may become unavailable at any time.
Why can I not send any mails from my server?
Unfortunately, email spammers and scammers like to use cloud hosting providers. And we at Hetzner naturally want to prevent this. That's why we block ports 25 and 465 by default on all cloud servers. This is a very common practice in the cloud hosting industry because it prevents abuse. We want to build trust with our new customers before we unblock these mail ports. Once you have been with us for a month and paid your first invoice, you can create a limit request to unblock these ports for a valid use case. In your request, you can tell us details about your use case. We make decisions on a case-by-case basis.
As an alternative, you can also use port 587 to send emails via external mail delivery services. Port 587 is not blocked and can be used without sending a limit request.
Port blocking is enforced per account. If a server is transferred to a project that is owned by another account, the port-blocking rules of the new owner will apply. If your server uses ports 25 and 465, ensure that the new owner has these ports unblocked before transferring the server to the other project.
I can not reach my instance / I have two default routes. How can I fix this?
A bug in hc-utils caused NetworkManager to manage the private network interface and therefore installs a wrong default route.
We have published an updated hc-utils package. After the update got installed, the wrong default route should not get installed anymore.
The updated hc-utils is available here:
RHEL / CentOS / Rocky 8: https://packages.hetzner.com/hcloud/rpm/hc-utils-0.0.4-1.el8.noarch.rpm
Fedora 34/35: https://packages.hetzner.com/hcloud/rpm/hc-utils-0.0.4-1.fc34.noarch.rpm
Why did I not receive a root password after server creation?
When you add an SSH key during server creation, we will not send you root credentials (see "Is root password authentication disabled on servers that are created with an SSH key?").
If you do not add an SSH key during server creation, we will send you an email with root credentials.
The email with the root credentials is only sent to email addresses that you set as "main address" in your user account at accounts.hetzner.com/account/mail.
The email with the root credentials looks like this:
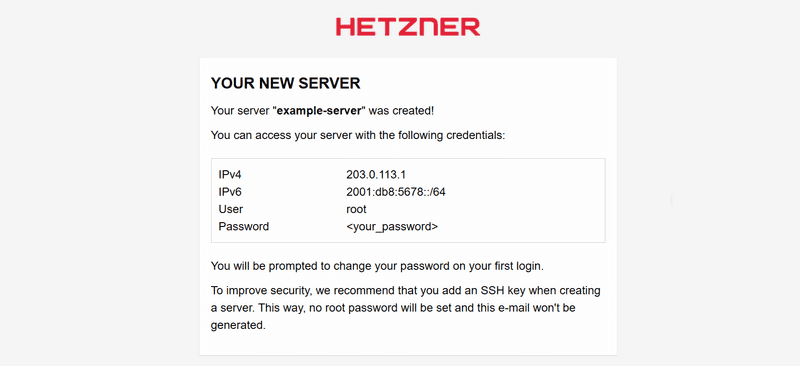
If you didn't receive an email or deleted it, you can reset the root password in Hetzner Console as explained in the FAQ entry above "How can I reset my root password?". Note: If the server was created with an SSH key, you can only use this password in the console (see "What is the console?").
On servers that were created with an SSH key, you only have these authentication options:
- Via SSH, authenticate with your SSH key only
- Via the console, authenticate with a generated root password
If you want to enable root password authentication for SSH connections, follow the commands mentioned in the FAQ entry above to modify the SSH configuration.
I have added my SSH key to the Hetzner Console, why can I not access my existing server via my SSH key?
When creating a new server, you can select an SSH key that will automatically be added to the server. Instead of a password, this key is then used to authenticate on that server. Unfortunately, we cannot add SSH keys to existing servers. On those, you will have to add your SSH key manually. The community article Setting up an SSH key, for example, explains how to do this in step 4.
Why are no hard disks and/or network interfaces recognised when installing my custom BSD distribution (eg. pfsense or OPNsense)?
If you have any difficulties with the installation of a custom BSD distribution (e.g. error message / server stopped working) please create a support request. In your request, give us some details about what went wrong, and our support team will check if they can help so that you can install your custom distribution successfully.
What is the console?
The console that is provided on the Hetzner Console is a VNC console. VNC consoles allow you to connect to a server as if you were sitting directly in front of the device with keyboard and mouse. The getting started Using the console explains how to open the console and how to login.
The VNC console is provided as a tool for emergency situations, such as installing an operating system or resetting a password. For regular management and maintenance of your server, we highly recommend using SSH as it is more reliable, efficient, and secure for day-to-day operations.
VNC consoles can display a graphical user interface, if the required software is installed on the server (see How to install TigerVNC on Ubuntu). Note, however, that root access is required to login on the console on Hetzner Console.
Why does the keyboard in the VNC console not always work reliably?
The VNC console defaults to the QWERTY (en-US) keyboard layout, which is a common standard for many systems. While it's possible to set other layouts during VM startup, we cannot guarantee compatibility with all configurations.
When using the VNC console for text input, each character is sent as individual key presses and releases directly to the hypervisor. This process involves interpreting scan codes and modifier keys (shift, alt-gr) based on the detected keyboard layout. Challenges may arise when your system's configuration differs from our default settings.
Why was my server deleted immediately after it was created?
When you create a server, it can happen that it is visible for a short period of time, and then gets deleted immediately. Server creation happens in two steps: In a first step, there is a best-effort availability check. If this availability check is successful, the server is immediately assigned an ID and becomes visible in the frontend. Since the actual allocation of the server on a host takes longer, it is done in a second step (called Action in our API). In this second step, it can happen that due to limited availability no free resources can be found — despite a positive best-effort availability check in the first step.
You can recognize such a situation:
- In the Hetzner Console as a failing Activity
- In the API as a failing Action
Why is the server not created even though it is shown as available?
See also: Why can Cloud instances occasionally not be ordered?
Since cloud servers are created and deleted in real time, their availability is dynamic and can change at any time. The availability of a server plan is checked and updated about every 15 minutes. When you open the page to create a new server, or to rescale to a different server plan, the most recently known availability status of the plans is displayed. The following scenarios can happen:
-
Outdated availability
Depending on when the last check occurred, the availability of individual plans may have changed in the meantime. As a result, it is possible that server plans are still shown as available, even though they are no longer available. -
No automatic page refresh
The availability status of server plans is loaded only once when you initially access the page. If the availability status of a plan changes while you are on the page, the page will not update with the new information and will continue to display the initially loaded data. New information is only loaded, if you manually reload the page.
Why is RAM usage not shown in Hetzner Console?
The data shown in Hetzner Console graphs, such as CPU utilization or network traffic, is retrieved from the host server and does not require access to the customer's cloud server.
Information about RAM usage, however, requires access to the cloud server. Retrieving this information would involve installing software on the customer's cloud server, which we do not do. For this reason, we cannot display a RAM graph showing your server's memory utilization.