Introduction
Filesystems organize how data is stored, but under some circumstances, the filesystem may become corrupted, and certain parts of it can become inaccessible. This can trigger warning messages, or the system might beging to behave in a "strange" way, like when processes crash and the software does not start anymore. In this case, you should verify the integrity of the filesystem.
This article explains how to run a manual filesystem check and how to activate the automatic filesystem check for Linux and Windows systems.
The Linux filesystem check (FSCK)
First, you should identify the filesystems and their partitions of your system by running the command lsblk.
If the output looks like the output below, and there are some RAID entries in the TYPE column, you have a software RAID running. You should check all md partitions here; those are md0, md1 and md2 in this example:
root@your_host ~ # lsblk
NAME    MAJ:MIN RM   SIZE RO TYPE  MOUNTPOINT
loop0     7:0    0     4G  1 loop
sda       8:0    0 447.1G  0 disk
├─sda1    8:1    0     4G  0 part
│ └─md0   9:0    0     4G  0 raid1
├─sda2    8:2    0   512M  0 part
│ └─md1   9:1    0 511.4M  0 raid1
└─sda3    8:3    0 442.6G  0 part
  └─md2   9:2    0 442.5G  0 raid1
sdb       8:16   0 447.1G  0 disk
├─sdb1    8:17   0     4G  0 part
│ └─md0   9:0    0     4G  0 raid1
├─sdb2    8:18   0   512M  0 part
│ └─md1   9:1    0 511.4M  0 raid1
└─sdb3    8:19   0 442.6G  0 part
  └─md2   9:2    0 442.5G  0 raid1
If the output looks more like the one below, there is no software RAID, you should check and the partitions sda1, sda2, sda3 and sdb1 in this example:
root@your_host ~ # lsblk
NAME    MAJ:MIN RM   SIZE RO TYPE  MOUNTPOINT
loop0     7:0    0     4G  1 loop
sda       8:0    0 447.1G  0 disk
├─sda1    8:1    0     4G  0 part
├─sda2    8:2    0   512M  0 part
└─sda3    8:3    0 442.6G  0 part
sdb       8:16   0 447.1G  0 disk
└─sdb1    8:17   0   446G  0 part
Display filesystem check information
Use the following command to verify when the last filesystem check was executed and if it is already set to automatic mode:
tune2fs -l /dev/<PARTITION> | grep -i 'mounted|last checked|interval'For each partition, just replace the placeholder <PARTITION> with the names of your partitions and execute the commands one after the other. This example is for the partition md2:
tune2fs -l /dev/md2 | grep -i 'mounted|last checked|interval'
Last mounted on:          /
Last checked:             Tue Feb 13 11:52:32 2020
Check interval:           0 (<none>) # Means that automatic mode is off
Automatic filesystem check
Before you activate the periodic filesystem check, think about this: the check will be automatically performed during some future restarts. This might prolong the boot process time and also the downtime of your server. So, under certain circumstances, you should instead perform manual filesystem checks at regular intervals.
To activate the automatic filesystem check, use the following two commands:
tune2fs -c <BOOT_COUNT> /dev/<PARTITION>
tune2fs -i <MIN_TIME_BETWEEN> /dev/<PARTITION>
In the commands, just replace:
<BOOT_COUNT>with the times of boot processes in between the checks<PARTITION>with the partition name<MIN_TIME_BETWEEN>with the minimum time between checks
For example, check partition md2 every 3 boots with a minimum time of 1m (month) in between :
tune2fs -c 3 /dev/md2
tune2fs -i 1m /dev/md2
You might repeat those two commands for all your partitions.
Manual filesystem check
You can start a manual filesystem check via a system utility called fsck (file system consistency check). You can only perform a filesystem check on un-mounted partitions, so we recommend you boot the Rescue System. If you have LVM volumes, this is not always required — in this situation, just jump to the next section.
Once you are logged into the Rescue System, please use the following command to start the check with automatic repair:
fsck -fy /dev/<PARTITION>In this command, replace <PARTITION> with the partition names you want to check, step by step, like in this example:
fsck -fy /dev/md0
fsck -fy /dev/md1
fsck -fy /dev/md2
The output will then tell you about the state of your filesystem and list any actions taken to repair it.
Manual filesystem check when using LVM
If you're using a LVM (Logical Volume Manager), you can create a snapshot. So you don't need to unmount the filesystem during a filesystem check. And in certain castes, you don't need to bootthe Rescue System.
-
You need to unmount the filesystem for a short time to create a temporary snapshot volume:
umount /dev/<volume_group>/<volume>
OR
umount <mountpoint>
If the output states that the device is currently in use, you might need to identify and stop the specific processes or need to logout users:
umount /dev/vg0/data
umount: /dev/vg0/data: device is busy.
        (In some cases, you can find useful information about processes that use
         the device with lsof(8) or fuser(1).)
If that isn't possible (e.g. with the root filesystem), you need to perform a boot to the Rescue System to perform a filesystem check.
-
Once you have successfully unmounted the volume, you can create the snapshot volume:
lvcreate -s -n <snapshot_name> -L <snapshot_size> /dev/<volume_group>/<volume>Important: Please make sure that the snapshot size is not completely full during the filesystem check. You need to make the size of the snapshot slightly larger than what you really need.
Example:
lvcreate -s -n my_fsck_snapshot -L 30G /dev/vg0/data -
Now, just re-mount the correct filesystem:
mount /dev/<volume_group>/<volume> <mountpoint>Example:
mount /dev/vg0/data /media/data -
Afterwards, you can start the filesystem check on the snapshot volume like with a normal partition:
fsck -fy /dev/<volume_group>/<snapshot_name>Example:
fsck -fy /dev/vg0/my_fsck_snapshot -
Finally, remove the temporarily created snapshot volume:
lvremove -f /dev/<volume_group>/<snapshot_name>Example:
lvremove -f /dev/vg0/my_fsck_snapshot
If there is no need for you to keep the volume mounted during the filesystem check, or you have booted your server to the Rescue System, you can just perform the filesystem check on the (unmounted) volume itself:
fsck -fy /dev/<volume_group>/<volume>Example:
fsck -fy /dev/vg0/dataThe Windows filesystem check (CHKDSK)
Automatic filesystem check
From time to time, Windows will automatically run a filesystem scan during startup. But usually, you’ll have to do it yourself, especially in a server environment where the system isn't restarted often. Even if you’re just having strange problems with apps not loading or crashing that you haven’t been able to resolve any another way, you might consider checking the filesystem manually.
Manual filesystem check
You can start a filesystem check with the Windows Explorer, but using the command line is an even easier method. If your system doesn't boot up anymore, you can request a Windows Recovery Image in a support ticket. Go to the "Support" section on Robot and ask for a Windows Recovery Image and a KVM Console and use the command line there. However, if you are in the booted Windows system, please open the command line with Administrator privileges:
-
Click on the
Windows symbolin the bottom left corner, or press theWindowsorSuperkey. -
Type
cmd.exe. -
Press the keys
Ctrl+Shift+Entersimultaneously to open the command line with Administrator privileges. -
Confirm the displayed dialog by clicking on
Yes. -
The command line should open now, and it's title should start with "Administrator":

-
At the prompt, please type in the following command and press
Enter:chkdsk C: /f /r /xIf you have executed the command within the running system, it is normal to see the following message:
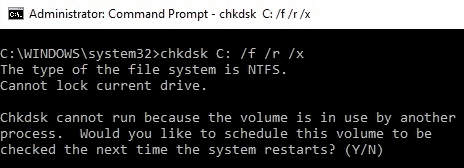
In this case, please press
YandEnter. Important note: A filesystem check can take quite long to finish (between couple of minutes and hours). So, we recommend that you wait to do the required restart, which triggers the filesystem check, until it is convenient for you to have a longer amount of downtime on the server. -
Then, restart the server at your convenience.
-
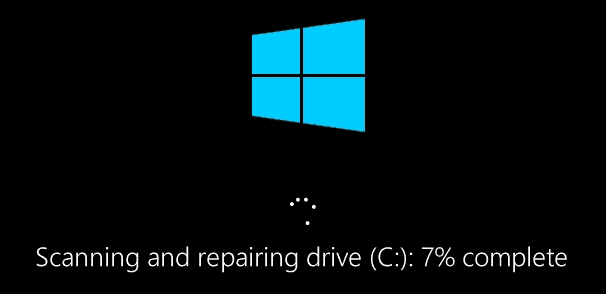
The filesystem check will now test the integrity of your filesystem and automatically repair issues:
-
After the filesystem check has finished, your installed system will boot up and should become reachable again.
If you have more than one FAT, ExFAT or NTFS formatted partition in use, you should repeat the CHKDSK procedure with the remaining partitions as well. To do that, open the Windows Explorer and click on "Computer" in the left column. That will show you those partitions with their identifiers (like C: D: E:...). If you have already checked C:, just repeat the procedure with the remaining drive letters by replacing the drive identifier in the aforementioned command:
chkdsk D: /f /r /x
chkdsk E: /f /r /x
...
You can find more information at Microsoft's Documentation.
To repair ReFS volumes using Windows, ReFSUtil may be used.
If you still face issues after repairing all your filesystems, you might also try the System File Checker SFC.exe. There is also a guide for this at Microsoft's Documentation.