General information
Compatibility
While many customers successfully use ESXi on the majority of our servers, it is important to note that we cannot provide official support for it and do not guarantee compatibility.
Network configuration
- VMware vSphere Hypervisor is an operating system designed for pure virtualization and supports neither NAT nor routing. Therefore, you can only use a true bridged setup.
- To use a subnet, you need to set up an additional single IP as a router VM.
Installation
- The installation and configuration of ESXi takes about 20-30 minutes, even without any prior knowledge. Please check out the Installation Guide for further information on installing ESXi.
License
-
We at Hetzner are not license partners for VMware. You can find further information here at the official website.
-
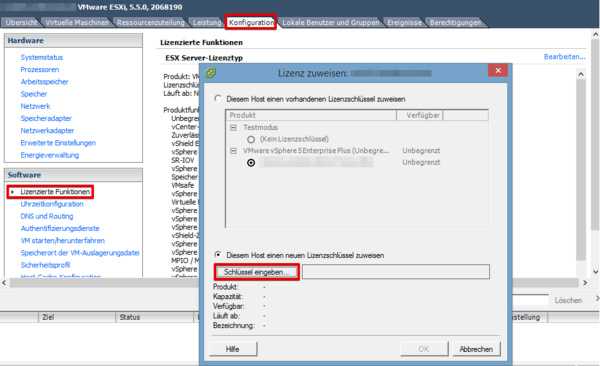
You can enter the license via the vSphere Client. Go to the Configuration tab, the Software section, and then choose Licensed functions in the menu. After selecting this, you can click on the Edit button to the right and then enter the license key.
Hetzner specific information
Network configuration
- For connectivity between multiple ESXi servers within the same subnet, you need set up host routes via gateway because of network security restrictions.
host A
esxcfg-route -a <IP Host B> 255.255.255.255 <Gateway IP>
host B
esxcfg-route -a <IP Host A> 255.255.255.255 <Gateway IP>Single IP addresses
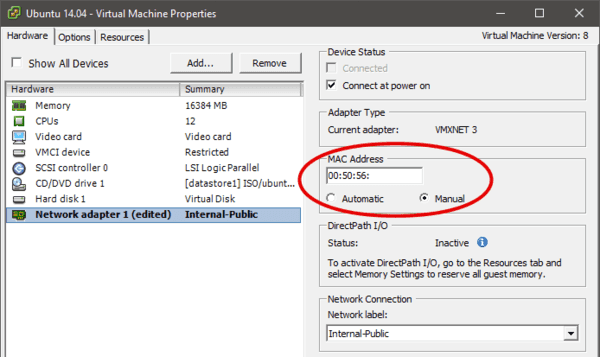
- IP addresses are, by default, statically mapped to the MAC address of the host. It is possible, however, to get separate MAC addresses for the additional single IPs via Robot. You can then configure these can for the virtual machines. To get these MAC addresses assigned, log into Robot, choose "Server" from the menu on the left, select the correct server, and then click on the "IPs" tab. Then click on the icon next to the single IP address to get a MAC address.
Subnets
- To use a subnet (IPv4 as well as IPv6) in ESXi, you need to have at least one additional single IP set up as a router VM, since ESXi itself cannot route. When ordering a subnet, please make sure include a note that you want to use it for ESXi and it should be routed on the additional single IP.
IMPORTANT Since IPv6 subnets are routed to link-local addresses (MAC-based), it is only possible to use IPv6 in a limited way (meaning on a single VM).
IPv4
The confirmation email of the subnet contains (for example) the following information:
Below you will find the IP subnet added to your server 192.168.13.156.

Subnet: 192.168.182.16 /28
Mask: 255.255.255.240
Broadcast: 192.168.182.31

Usable IP addresses:
192.168.182.17 to 192.168.182.30
You do NOT get a separate MAC for each IP from a subnet.
IPv6
All servers come with a /64 IPv6 subnet. To see which IPv6 subnet your server has, please check the IPs tab of the server in Robot.
If you ordered your server before February 2013, you can order this subnet for free via Robot and it will be automatically activated.
The IPv6 subnet is routed to the default link-local address (which is derived from the MAC address) of the main IP. Using Robot, you can switch the routing of the IPv6 subnet to the link-local address of the virtual MAC (in other words, the additional single IP). You can do this on Robot using the same symbol which is located next to additional single IPs. It's the same symbol you use to request virtual MAC addresses. The host system, meaning the ESXi itself, receives no IPv6 address. This is neither necessary nor possible because ESXi cannot work with a fe80::1 gateway.
In order to use these IP addresses in virtual machines, you need a router VM supplemented by an additional virtual NIC from the new subnet. The subnet itself requires a new vSwitch in ESXi which all VMs in the subnet will be connected to.
Notes
If you experience connection problems in systems with Realtek network cards, then you can solve this under certain circumstances by deactivating offloading and activating polling. However, this also reduces the performance.
- checksum offload: deactivated
- segmentation offload: deactivated
- large receive offload: deactivated
- device polling: enabled
Preparations in the vSphere client
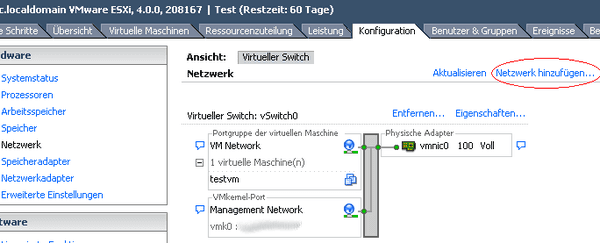
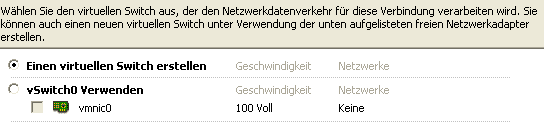
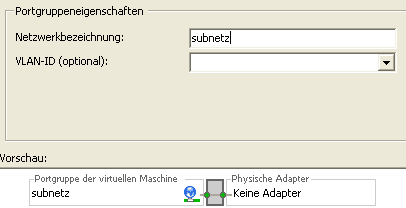
- Create a vSwitch (in the example, the name "subnetz" is used)
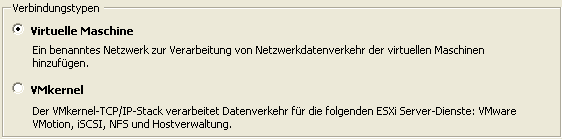
- Add a second NIC to the router VM. Connected network: subnetz (the previously created vSwitch)
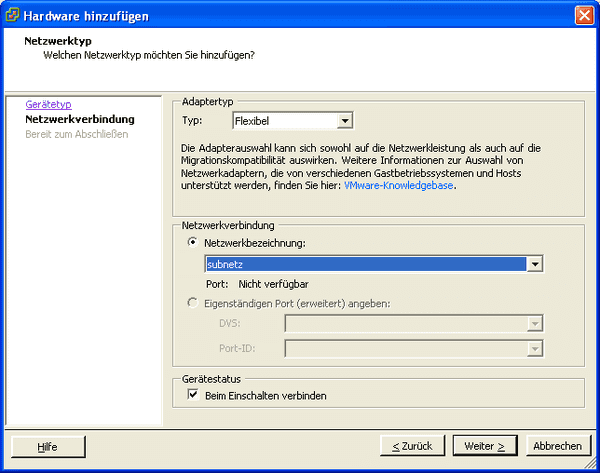
- The NIC of the virtual machine in the subnet. Connected network: subnetz
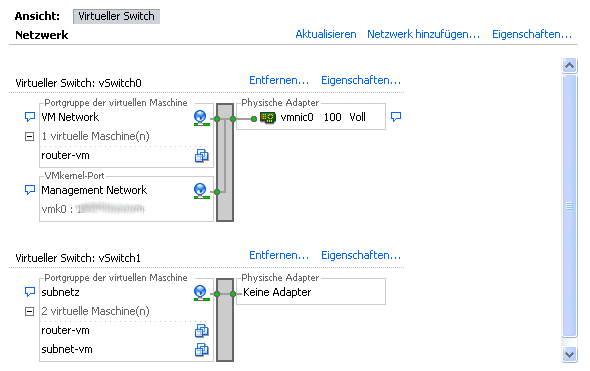
The networking overview should show the following:
Configuration of the Router VM
- Example of
/etc/network/interfaceson the router VM
# The loopback network interface
auto lo
iface lo inet loopback
# The primary network interface
# WAN-NIC im VMnetwork
auto eth0
iface eth0 inet dhcp
# for the IPv6 subnet the configuration is analog to other virtualisations
iface eth0 inet6 static
 address 2a01:4f8:61:20e1::2
 netmask 128
 gateway fe80::1
# LAN NIC in Subnet
auto eth1
iface eth1 inet static
 address     192.168.182.30
 netmask     255.255.255.240
# The prefix/netmask can/must be changed according to the amount of network
# segments
iface eth1 inet6 static
 address    2a01:4f8:61:20e1::2
netmask 64- Example of
/etc/network/interfacesof a Linux VM in the subnet
# The loopback network interface
auto lo
iface lo inet loopback
# The primary network interface
auto eth0
iface eth0 inet static
 address 192.168.182.17
 netmask 255.255.255.240
 gateway 192.168.182.30
iface eth0 inet6 static
 address    2a01:4f8:61:20e1::4
 netmask    64
 gateway    2a01:4f8:61:20e1::2
The router VM is now connected to both networks, and you can use it as a gateway for virtual machines in the subnet. Don't forget to activate IP forwarding in the kernel:
echo 1 > /proc/sys/net/ipv4/ip_forward
echo 1 > /proc/sys/net/ipv6/conf/all/forwarding
To make this persistent across reboots, add the following line to /etc/sysctl.conf
net.ipv4.ip_forward=1
net.ipv6.conf.all.forwarding=1
The virtual machines should now be accessible (via SSH for example) via their assigned IPs.
Installation Guide
-
Choose the Rescue System as the OS for the server you order.
-
If you would like RAID, you can add a 4-Port RAID controller since ESXi doesn't support software RAID.
-
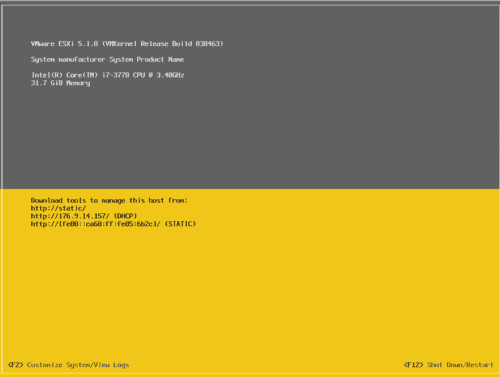
Once the server is online (you will get an email from us informing you of this), you can order a KVM Console and use that to virtually mount an ISO file of the version of ESXi you want to install. You can find further information on ordering a KVM Console and using it to install an OS on the KVM Console page.
Then, you should see the following screen:
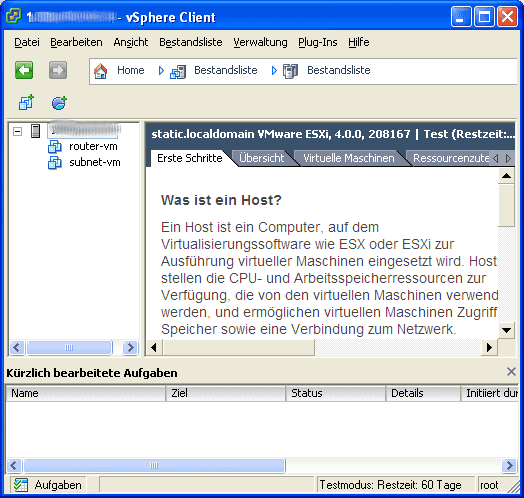
- After a reboot, log in using the password that you entered during the installation. This is the root password for SSH as well as the password for the VMware vSphere Client (requires Windows). You can then download this separately via a browser.
- After you're finished the installation, you can order up to six additional single IP addresses via Robot. You can get a MAC address for your additional single IP on Robot under the IPs tab. You will see a small button next to the IP address. Clicking on that button will give the IP address a virtual MAC.
- Configure the MAC addresses of the virtual servers with the corresponding IP addresses with vSphere. Once you have done this, even DHCP will work via the Hetzner network!
For additional information regarding ESXi and its usage, please refer to the official website.
Manual installation of updates
You can only do the installation of updates in the free version via the console or via VMware Go. An update can be several hundred megabytes, which can take a long time with a standard DSL connection, which is why the following guide can help. Follow this guide at your own risk. There is no warranty or guarantee that it will work!
Before you start, you need two things. First, you need SSH activated access. And second, the system needs to be in maintenance mode. You can activate this using:
vim-cmd hostsvc/maintenance_mode_enter
Installation of patches
After you have transferred the patches onto the system, you can install them. It is important that you enter the full path name, eg.:
esxcli software vib install --depot="/vmfs/volumes/datastore1/patches/ESXi510-201210001.zip"
Installation Result
Message: The update completed successfully, but the system needs to be rebooted for the changes to be effective.
Reboot Required: true
[...]
After a reboot, you need to exit from the maintenance mode:
vim-cmd hostsvc/maintenance_mode_exit
Monitoring RAID controller
3ware Controller
For the 3ware controller, there is both a CIM Provider as well as a CLI. You can use the 64-bit CLI for Linux from version 9.5.2 onwards.
Note: 3ware controllers are only supported by ESXi 5.0 via an external driver.
Adaptec Controller
For Adaptec controllers, you need to manually install the CIM Provider and the CLI (arcconf). You also need to have an up-to-date version of the driver. You can find an installation guide on the Adaptec website (PDF).
- RAID driver Version 5.2.1.29800
- Remote Arcconf
- Adaptec CIM Providers
You can start monitoring by installing remote ARCCONF via a Windows/Linux system.
$ arcconf GETCONFIG 1 AD
LSI Controller
LSI provides a CIM/SMIS provider. After you've finished the installation, the hardware monitoring page in the vSphere client displays the status of the RAID. However, you can only get an active alarm in the paid version and when running vCenter.
Or you can install the command line tool MegaCLI, which you can also use to manage the RAID controller. You can use a script to automate the display of status information. But you need to run this script and notifications from another server.
Parallel operation of onboard controller/hardware RAID
During the installation, ESXi only sees one type of storage, so either the onboard SATA controller or an additional RAID controller. If drives are connected to both, then the hardware controller is prioritized, and the drives connected to the onboard controller are invisible. By manually loading the appropriate kernel module, you can still use these drives.
/sbin/vmkload_mod ahci
To have this module loaded automatically during start, you need to add the line above to /etc/rc.local and /sbin/auto-backup.sh.
Hardware change
Change MAC address
In the event of a hardware (ex)change, especially the motherboard, it should be noted that the ESXi host retains its original MAC address. This leads to issues. The switch will not automatically forward the correct new main IP to the server, as the MAC address that is being broadcast is incorrect. You need to reset the MAC address via the ESXi shell. There are several approches for doing this, listed in the following VMWare Knowledge Base Article. The most elegant solution is when the ESXi host automatically recognizes the new MAC address when changing platforms and uses that. You can use the following command for that:
esxcfg-advcfg -s 1 /Net/FollowHardwareMac
Either perform this command before the platform change or, if the change has already happened, there are two options:
- Order a KVM Console console and enable the ESXi shell, and then press
Alt + F1to switch to the console and enter the command. Afterwards, pressingAlt + F2will bring you back to the GUI. - Temporarily teach the switch the new MAC address by booting into the Rescue System and then back into the ESXi host. As a result, the ESXi host will now be reachable again via the main IP, but only for a limited amount of time. The length of this time depends on how long the switch takes to delete the ARP cache entry for this MAC address. Normally there is enough time to log in via SSH and execute the command, assuming that you have enabled SSH access. However, even this is configurable, as connecting via the ESXi client would be possible again.
With either option, you need to do a restart afterwards. You can initiate this via the console:
reboot
After a restart, the MAC address should be set correctly and you can verify this in the ESXi shell with the following command:
esxcfg-vmknic -l
The new MAC address should show up next to the main IP.