Why do I need both an access key and a secret key?
The keys serve two different purposes and you need both for every request.
- The access key provides information about users and their permissions. The API service needs this key to determine if the client has the appropriate permissions for the request it sent (e.g. upload or read files).
- The secret key is needed to verify that there was no man-in-the-middle attack in which someone modified your request. The secret key is used to generate a temporary cryptographic signature. The resulting signature is used to authenticate the request. When you use tools like
s3cmdorrclone, the signature is automatically created for you in the background.
How do I use the access key and the secret key?
As mentioned in "How can I access my Buckets?", you need to add the access key and a signature created via the secret key to every request. Usually, you would not want to create the signature yourself and with tools like s3cmd or rclone you luckily don't have to. This leaves you with two options:
- Use tools like
s3cmdorrclonethat automatically create the signature for you. preferred option - Use something like HTTP requests, for example, and create the signature yourself.
With tools like s3cmd and rclone, you save your access key and secret key in a dedicated configuration file. You only need to do this once for all future requests. When you send a request, the tool will automatically use the keys you saved and do all the work for you (generate a signature, add relevant information to the request). You don't need to specify any keys or signatures in the request yourself. For more details and example commands, see the getting started Using S3 compatible CLI tools.
With "manual" requests, you will need to generate the signature yourself and add the access key, the signature, and any other relevant information to the request. For more information, see Amazon S3 Docs » Authenticating REST Requests.
How does the authentication process work?
Note that the explanation below is very general and simplified for better understanding.
When you send a request, two parties are involved:
-
Before you send the request, you need to create a signature. In order to create a signature, you need an intermediate key and a StringToSign. You can use your personal secret key and the canonical request to create the intermediate key and the StringToSign:
- Secret key » Intermediate key
- Canonical request » StringToSign
Object storage uses an HMAC hash both as intermediate key and as the signature. To create an HMAC hash, HMAC takes a cryptographic hash function (e.g. AWS4-HMAC-SHA256), a cryptographic key (e.g. your secret key), and a string (e.g. date) and turns this information into the hash.
Intermediate key:
aws4_requestis a fixed string that should not be modified or replaced with any other data.Intermediate_Key_First = HMAC ( AWS4-HMAC-SHA256, Secret_Key, <Date> ) Intermediate_Key_Second = HMAC ( AWS4-HMAC-SHA256, Intermediate_Key_First, <Region> ) Intermediate_Key_Third = HMAC ( AWS4-HMAC-SHA256, Intermediate_Key_Second, <Service> ) Intermediate_Key_Final = HMAC ( AWS4-HMAC-SHA256, Intermediate_Key_Third, aws4_request )The client needs to provide a canonical request. It does not include any keys yet. It only represents what you want to achieve in string form. It needs to follow a standardized string format that includes the HTTP method (e.g. PUT, DELETE), the URL, the query parameter, headers, and other information. The canonical request is saved (e.g. in a file called
canonical_request.creq) and then added to the StringToSign.StringToSign:
AWS4-HMAC-SHA256                  # Hash function
<date_and_time>                   # Timestamp
<date>/<location>                 # Scope
SHA256( canonical_request.creq )  # SHA256 hash of the canonical request
-
The final intermediate key is used to generate the HMAC-SHA256 hash of the StringToSign. The resulting HMAC-SHA256 hash is used as the unique signature:
Signature = HMAC ( AWS4-HMAC-SHA256, Intermediate_Key_Final, StringToSign )
-
Next, the client creates the actual request and adds:
- The access key
- The unique signature
- The information used to create the intermediate keys and the StringToSign (e.g. timestamp)
This request is sent to the API service.
-
When the API service receives the API request, it does the following:
- It uses the access key to check if the client has the appropriate permission to do what the request is asking for.
- It uses the secret key associated with the access key form the request to generate the first intermediate key. The secret key is a symmetric key. This means the API service should get the exact same intermediate key as the client. It creates the final intermediate key and the StringToSign the same way the client did and uses those to generate its own unique signature just like the client.
-
In the step before, the API service generated its own signature. If the signature created by the API service is identical to the signature that was sent by the client, and the client has the necessary permissions, the API service will complete the API request.
What is my Object Storage user ID?
To get the user ID, you need to put the prefix p in front of the project ID. To refer to a specific key, you need to add a colon and the access key.
-
All keys within the same project
p<project_id> -
A single key
p<project_id>:<access_key>
To find out the project ID, you can open your project in Hetzner Console and check the URL:
https://console.hetzner.com/projects/<project-ID>/serversExample:
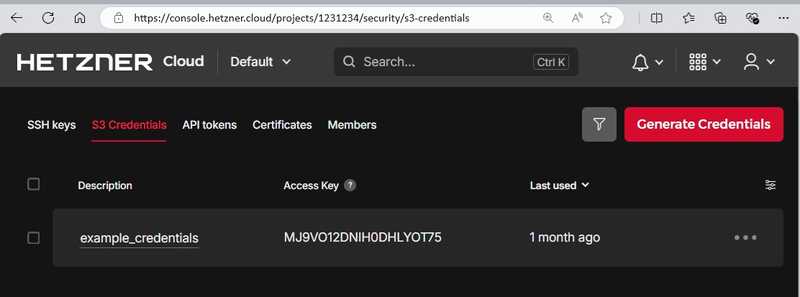
With the information from the example image above, you would get the following:
p1231234:MJ9VO12DNIH0DHLYOT75How do I restrict access per key?
By default, each key pair is automatically valid for every Bucket within the same project. This means, that every key has read and write permissions for every existing and new Bucket within the same project.
When it comes to permissions management, it is often recommended to follow the principle of "least privilege". This involves starting with the minimal set of permissions. Additional permissions are only granted as needed. This approach ensures that users have access only to the resources they need, minimizing potential security vulnerabilities.
If you want to distribute keys to other entities, you should make sure you fully trust those entities. If you don't fully trust them or if you simply want to increase security, you have the following options:
- Create separate projects for each group of entities that require access to the same set of Buckets. Add new Buckets to the corresponding projects.
- Save keys and Buckets in the same project, use bucket policies to fully block access to a specific Bucket and allowlist individual keys.
- Save keys and Buckets in separate projects and use bucket policies to grant individual keys access to a specific Bucket.
The section below explains how you can set up the bucket policies for the two different scenarios described above. Select the option that best suits your requirements:
-
Option 1: Fully block access and allowlist individual keys
This example assumes that keys and Buckets are saved in the same project.
For more information about
p<project_id>:<access_key>, see this FAQ entry.{ "Version": "2012-10-17", "Statement": [ { "Sid": "DenyAllUsersButOne", "Effect": "Deny", "Action": "s3:*", "Resource": [ "arn:aws:s3:::<bucket_name>", "arn:aws:s3:::<bucket_name>/*" ], "NotPrincipal": { "AWS": "arn:aws:iam:::user/p<project_id>:<access_key>" } } ] }Note: When you restrict access to specific access keys, our frontend will no longer be able to retrieve the objects from this Bucket and list them in Hetzner Console, resulting in an error message.
-
Option 2: Grant individual keys access
This example assumes that keys and Buckets are saved in separate projects to increase security.
Note that you still need at least one key pair in the same projects as your Buckets so that you can apply your bucket policies.
Projekt S3 credentialsaccess_key_1secret_key_1access_key_2secret_key_2Projekt Bucketsbucket1.fsn1.your-objectstorage.combucket2.fsn1.your-objectstorage.combucket3.fsn1.your-objectstorage.com
For more information about
p<project_id>:<access_key>, see this FAQ entry. Replace<project_id>with the ID of the project with your S3 credentials — not the project that contains your Buckets.{ "Version": "2012-10-17", "Statement": [ { "Effect": "Allow", "Principal": { "AWS": "arn:aws:iam:::user/p<project_id>:<access_key>" }, "Action": "s3:*", "Resource": [ "arn:aws:s3:::your-bucket-name", "arn:aws:s3:::your-bucket-name/*" ] } ] }If you want to restrict the key permissions to specific actions, you can replace
s3:*with the action that should be allowed.If you want to allow the action
s3:GetObjecton a Bucket that has versioning enabled, make sure you also allow the actions3:GetObjectVersion.
The command to apply the bucket policies depends on the S3-compatible tool you're using, so we recommend reading their documentation. With the MinIO Client, for example, you could use this command:
mc anonymous set-json my-policy.json <alias_name>/<bucket_name>